Back to Start
> Building instructions
Nano/Nano Every SK6812 colour word clock
> Github
> Nederlands
Build your own word clock with WS2812 RGB or SK6812 RGBW LEDs, showing one or four languages, on an Arduino ESP32 Nano.
The sketch also works on other ESP32 boards, with different pin numbering.
Compare other word clock software/hardware designs on the selector page.
The clock can be controlled with a:
Since V230, the word clock sketch has been combined with the Fibonacci clock sketch to simplify maintenance. There is also a third option; NOCLOCK.
The three architectues are easy to split apart via #define's in a few places, and the clock functions can be stripped out entirely with #define NOCLOCK. Functionality can be toggled on/off from the menu.
Coding for an HC-12 timesender was also added — it sends NTP time over HC-12 to another MCU equiped with a HC-12 module to receive the transmission up to 1000 meters away.
When no WiFi is available, time can instead be sent to the clock via a timesender iOS app or a timesender web page, using Bluetooth on your phone or tablet.
In several browsers the TAB can be split to see the menu and the Serial monitor response in one TAB.
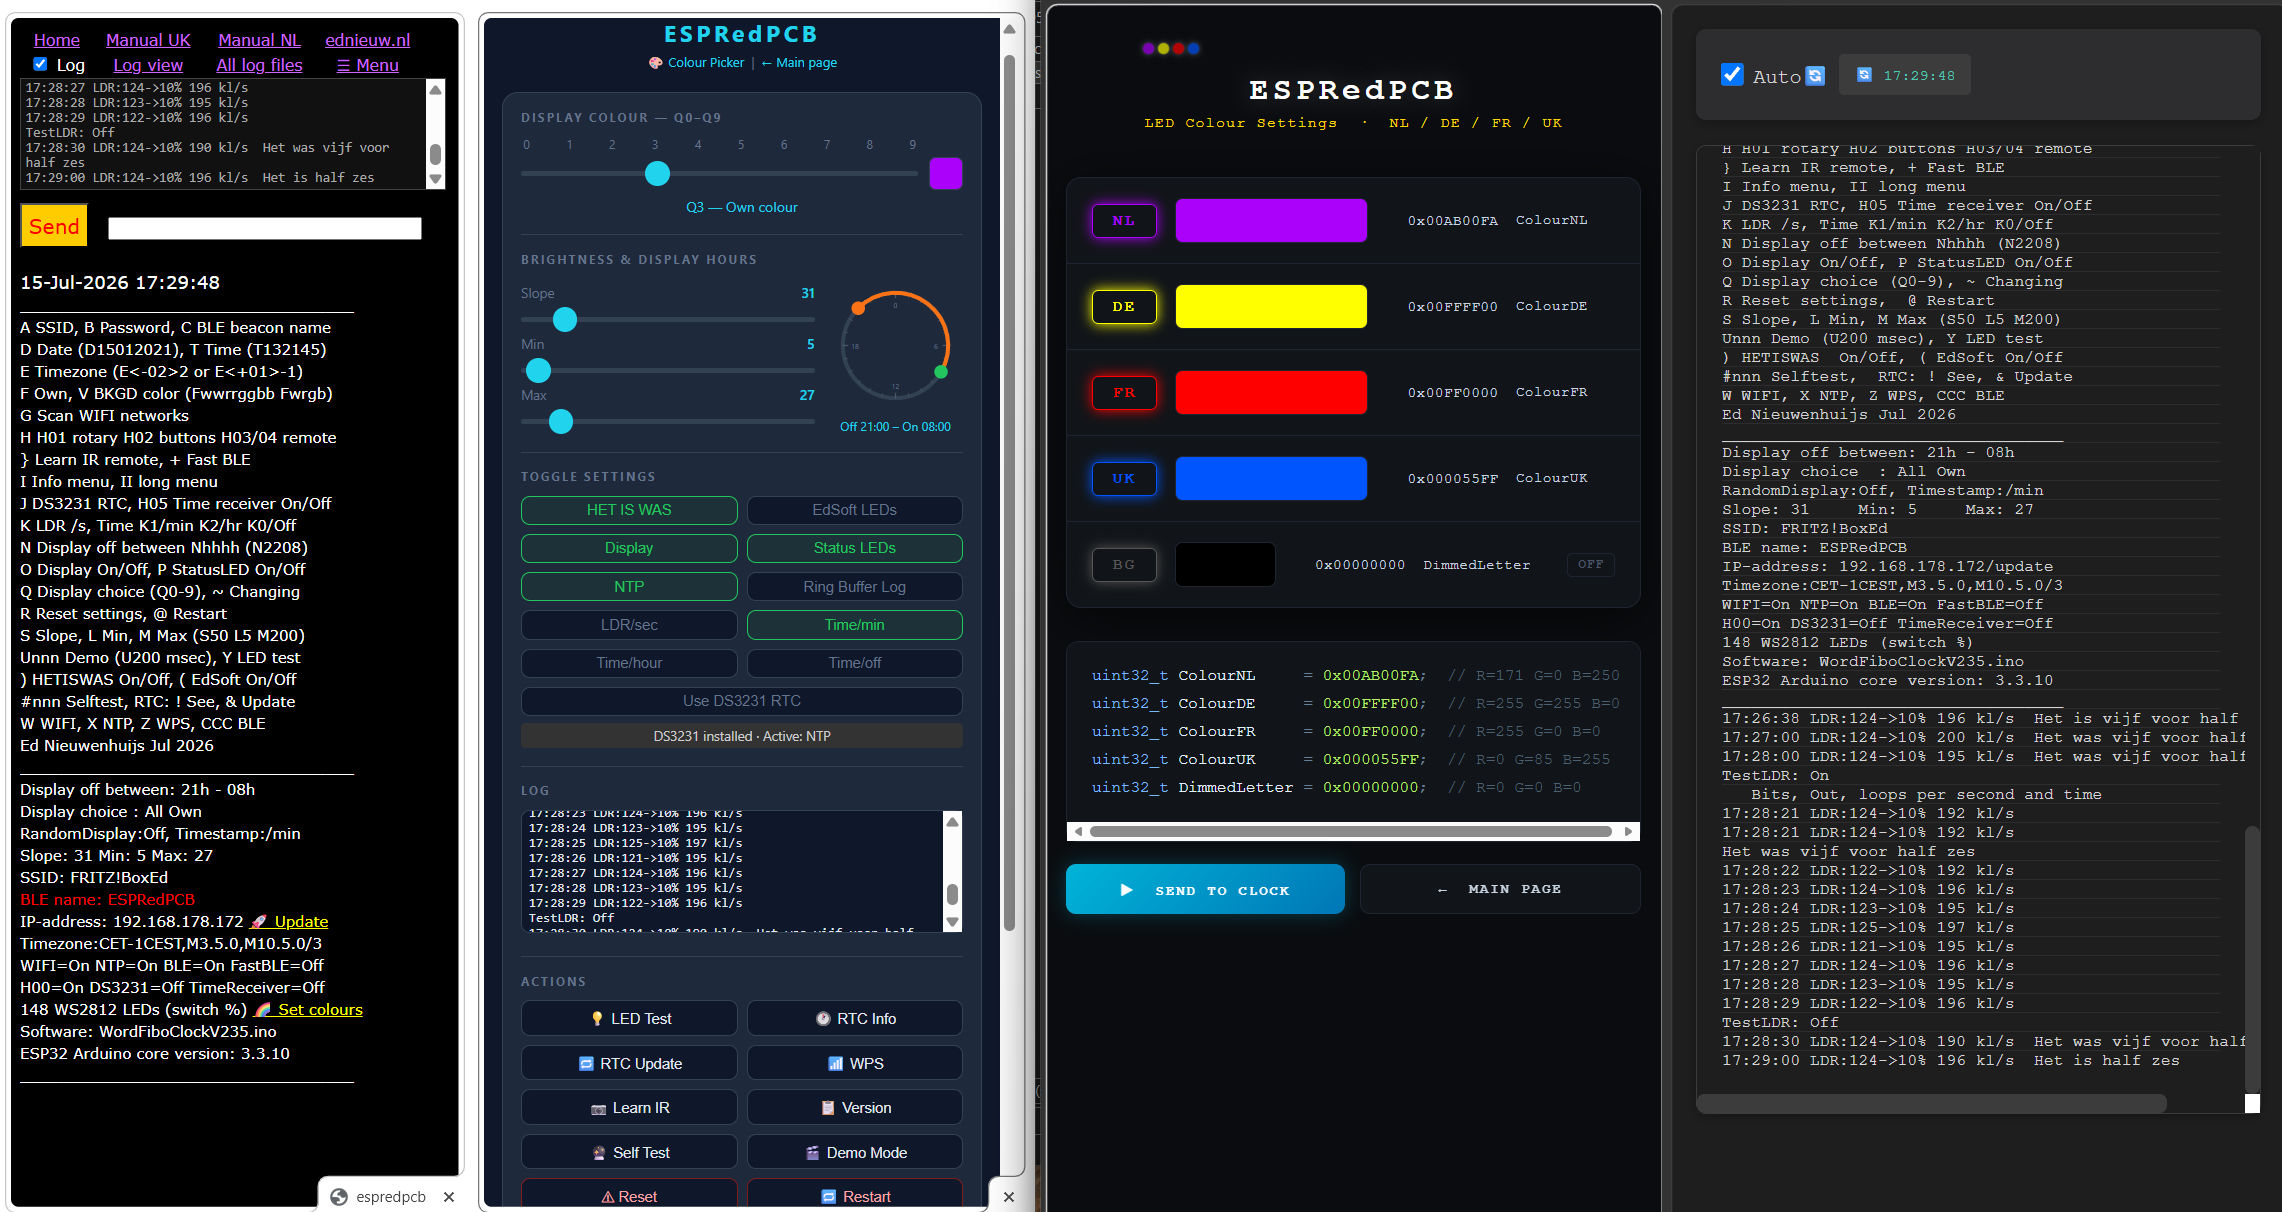
All menus in a browser since version V235.
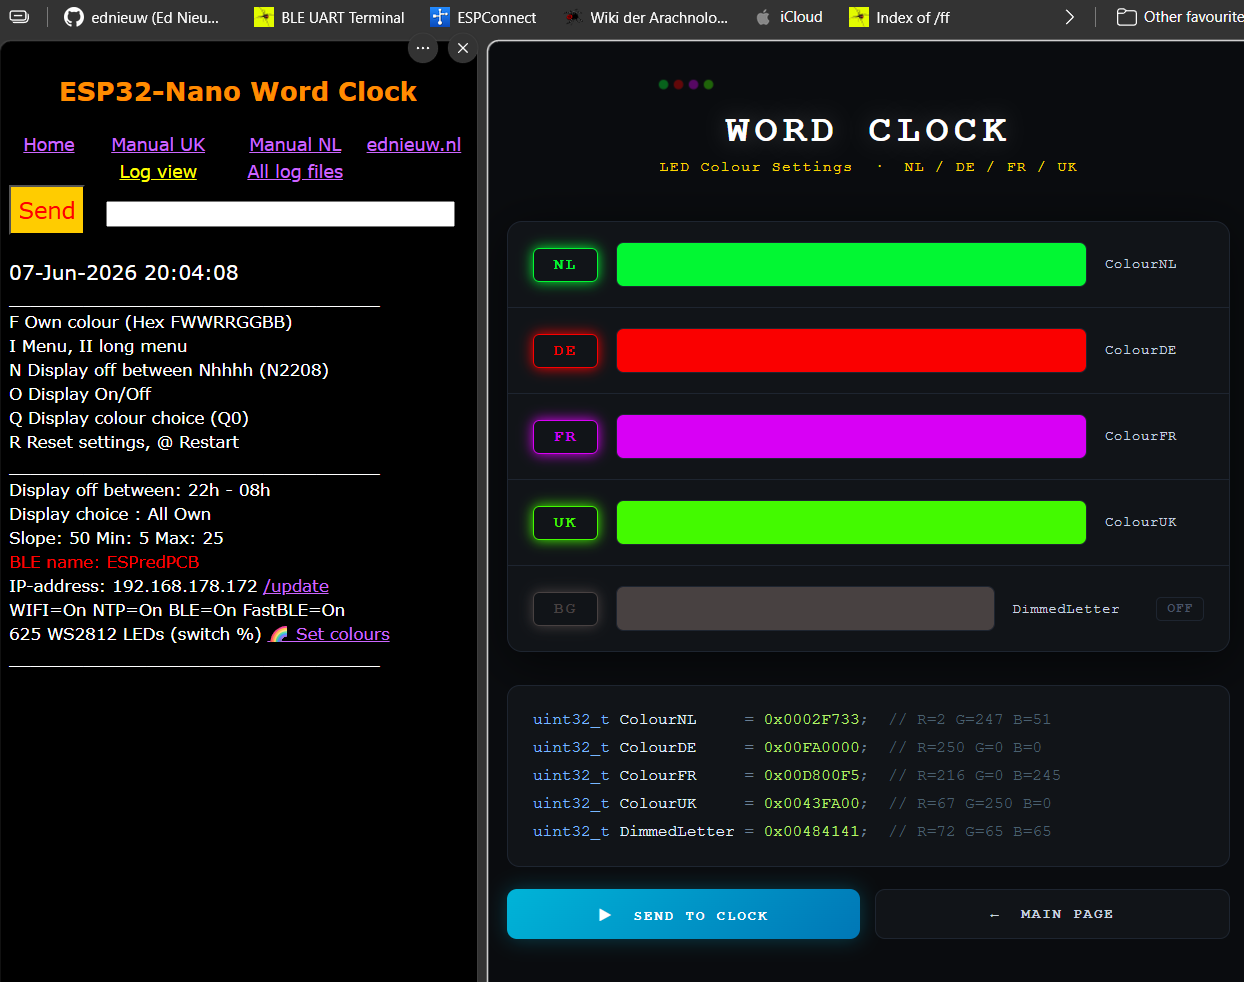
To connect the clock to WIFI the SSID and password of the router can be entered by the BLE serial terminal app or the WPS function can be used.
Software updates can be uploaded with OTA (Over the Air).
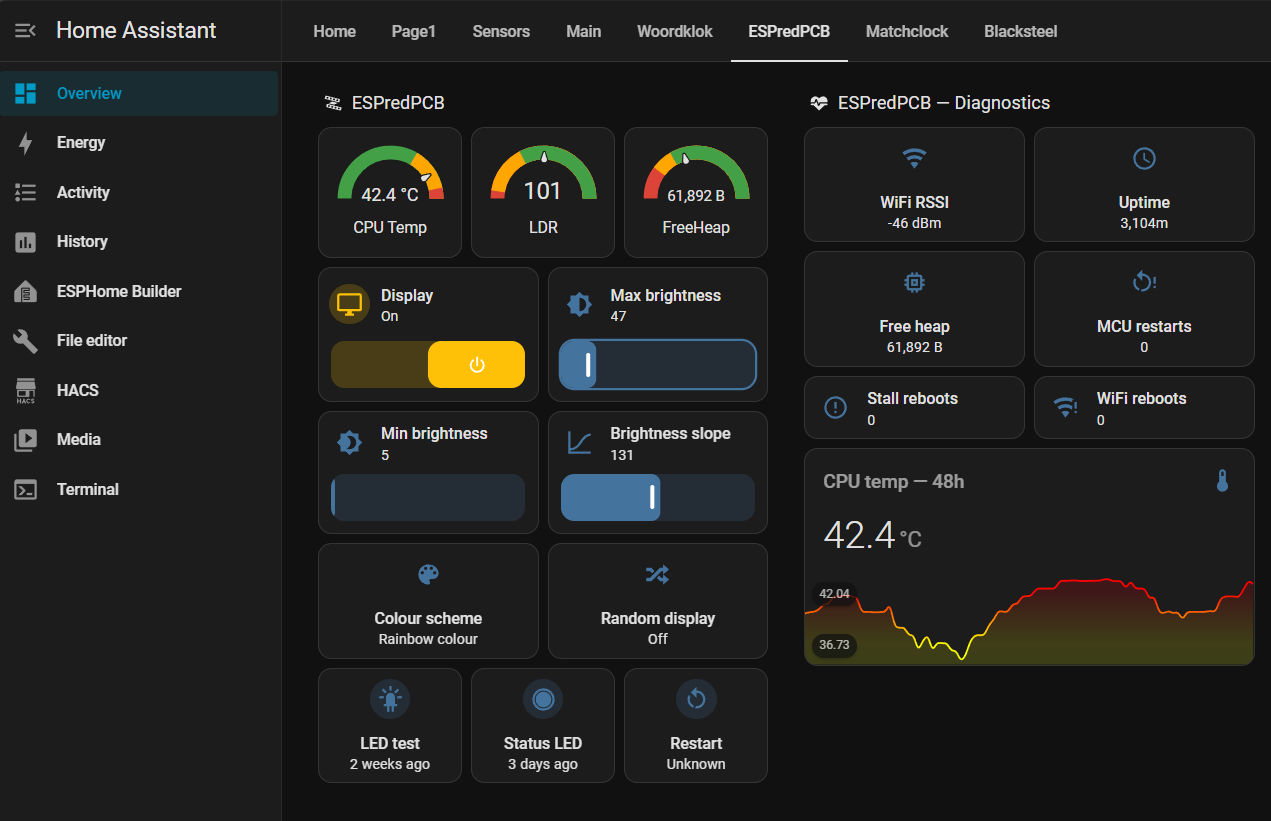
With MQTT in Home Assistant.
Full menu |
The clock will keep its time correct within the second using the internet Network Time Protocol (NTP) with daylight-saving corrections when a timezone is entered. If no internet is available a DS3231 RTC-module can be attached to the PCB to get an accurate time. With a rotary, membrane pad, time sender app or almost any IR-remote controller time can be set. An LDR (light-dependent resistor) is used to give the LEDs an optimal brightness. The ESP32 has an Espressif BLE/WIFI module. Bluetooth LE does not use the TI CC2541 chip but a Nordic nRF52 chip. That means you have to use a different BLE service for the serial communication — not characteristic FFE0 but 6e400001-b5a3-... etc. in your serial terminal app that communicates with the clock’s settings. See here: Use BLE on mobile to control the ESP32 An user manual in Dutch and English can be found in this repository: here |
Clock with Corten steel face
For my projects printed circuit boards (PCB) were designed with Fritzing software.
This Fritzing program is easy to use and it can export Gerber files that can be send to companies that print PCB's.
PCB's made in Europe can be ordered with the Fritzing app itself.
PCBWay print 10 PCBs for $5. With +/-$25 shipping and custom charges this is very cheap. The PCBs were received within a week after ordering and the quality was excellent. Just upload the Gerber files in the ZIP-file and pay the charges.
The PCB design .FZZ-file and Gerber files can be found in the folder PCB in this repository or here: ESP32 PCB
The PCB can connect a
The SK6812 RGBW or WS2812 RGB LED-strip operates at 5V. But the data signal from the Nano ESP32 is 3.3V.
I tried to use optocouplers to amplify the data signal from 3.3V to 5V, but that failed. See here:
https://ednieuw.com/ElecProj/OptoSK6812/OptocouplerSK6812.html
For level switching the 74HCT125 level shifter IC is used. It has four ports. The design of the PCB can use the other three ports on the IC for other uses.
A SK6812 RGBW strip, with 14 LEDs, also happily worked when the data line was connected directly to the 3.3V data line of the Nano ESP32 without using the 74HCT125 level shifter IC. I have not tested strips with more than 14 LEDs in the strip.
The lesson of this story is that you can connect the SK6812 RGBW strip with a 470 ohm resistor in the data line and a 200 - 1000 uF capacitor over the 5V and GND directly to the strip without the use of a level shifter.
But success is not guaranteed.
An alternative universal PCB to drive RGB(W) LEDs and white 2835 LED strips using shift registers can be found here: Nano ESP32 RGBW BW PCB
This PCB, with one Arduino source code, will support the colour LED clocks and the white LED clocks to run with a Arduino Nano ESP32.
The design of a minimum PCB for small spaces can also be found in the folder PCB-small in this repository.
Power for the LED-strip can be drawn from the VBUS-pin (5V USB) on the Nano if powered with a USB-C cable.
VBUS provides 5V whenever powered via USB.
It is possible to feed the LED-strip via this connection but keep in mind the power travels through the PCB and USB-C power supplies are able to supply over 20 A. This will probably melt the small copper lines on the PCB.
If powered via the VIN pin, VBUS is disabled. This means that while powering the board through the VIN pin, you can't get 5V power from the board.
The PCB can use different power connection options. A 5V, >1A power supply can be attached at the 5V power connection on the top left of the PCB.
If the red line shortcut (see picture below) is closed then the LED-strip is powered via the Power 6-21V (VIN) connection with 5V.
This will also power the Nano ESP32. You can connect the Vin on the ESP32 Nano with a 5V USB power supply although the minimum voltage is noted as 6V. The 1N5817 diode even lowers the voltage by 0.5V to 4.5V.
BUT KEEP IN MIND. This 5V connection is fed to the LED-strip directly. If a higher voltage power supply is connected the LEDs will be destroyed but Nano will turn on happily.
If the Nano ESP32 is connected via the USB-C port then the yellow connection must be shortcut. The LEDs will be powered by this power source. This is fine with 20 LEDs but probably not for longer strips.
After connections are made the PCB and hardware looks like this:
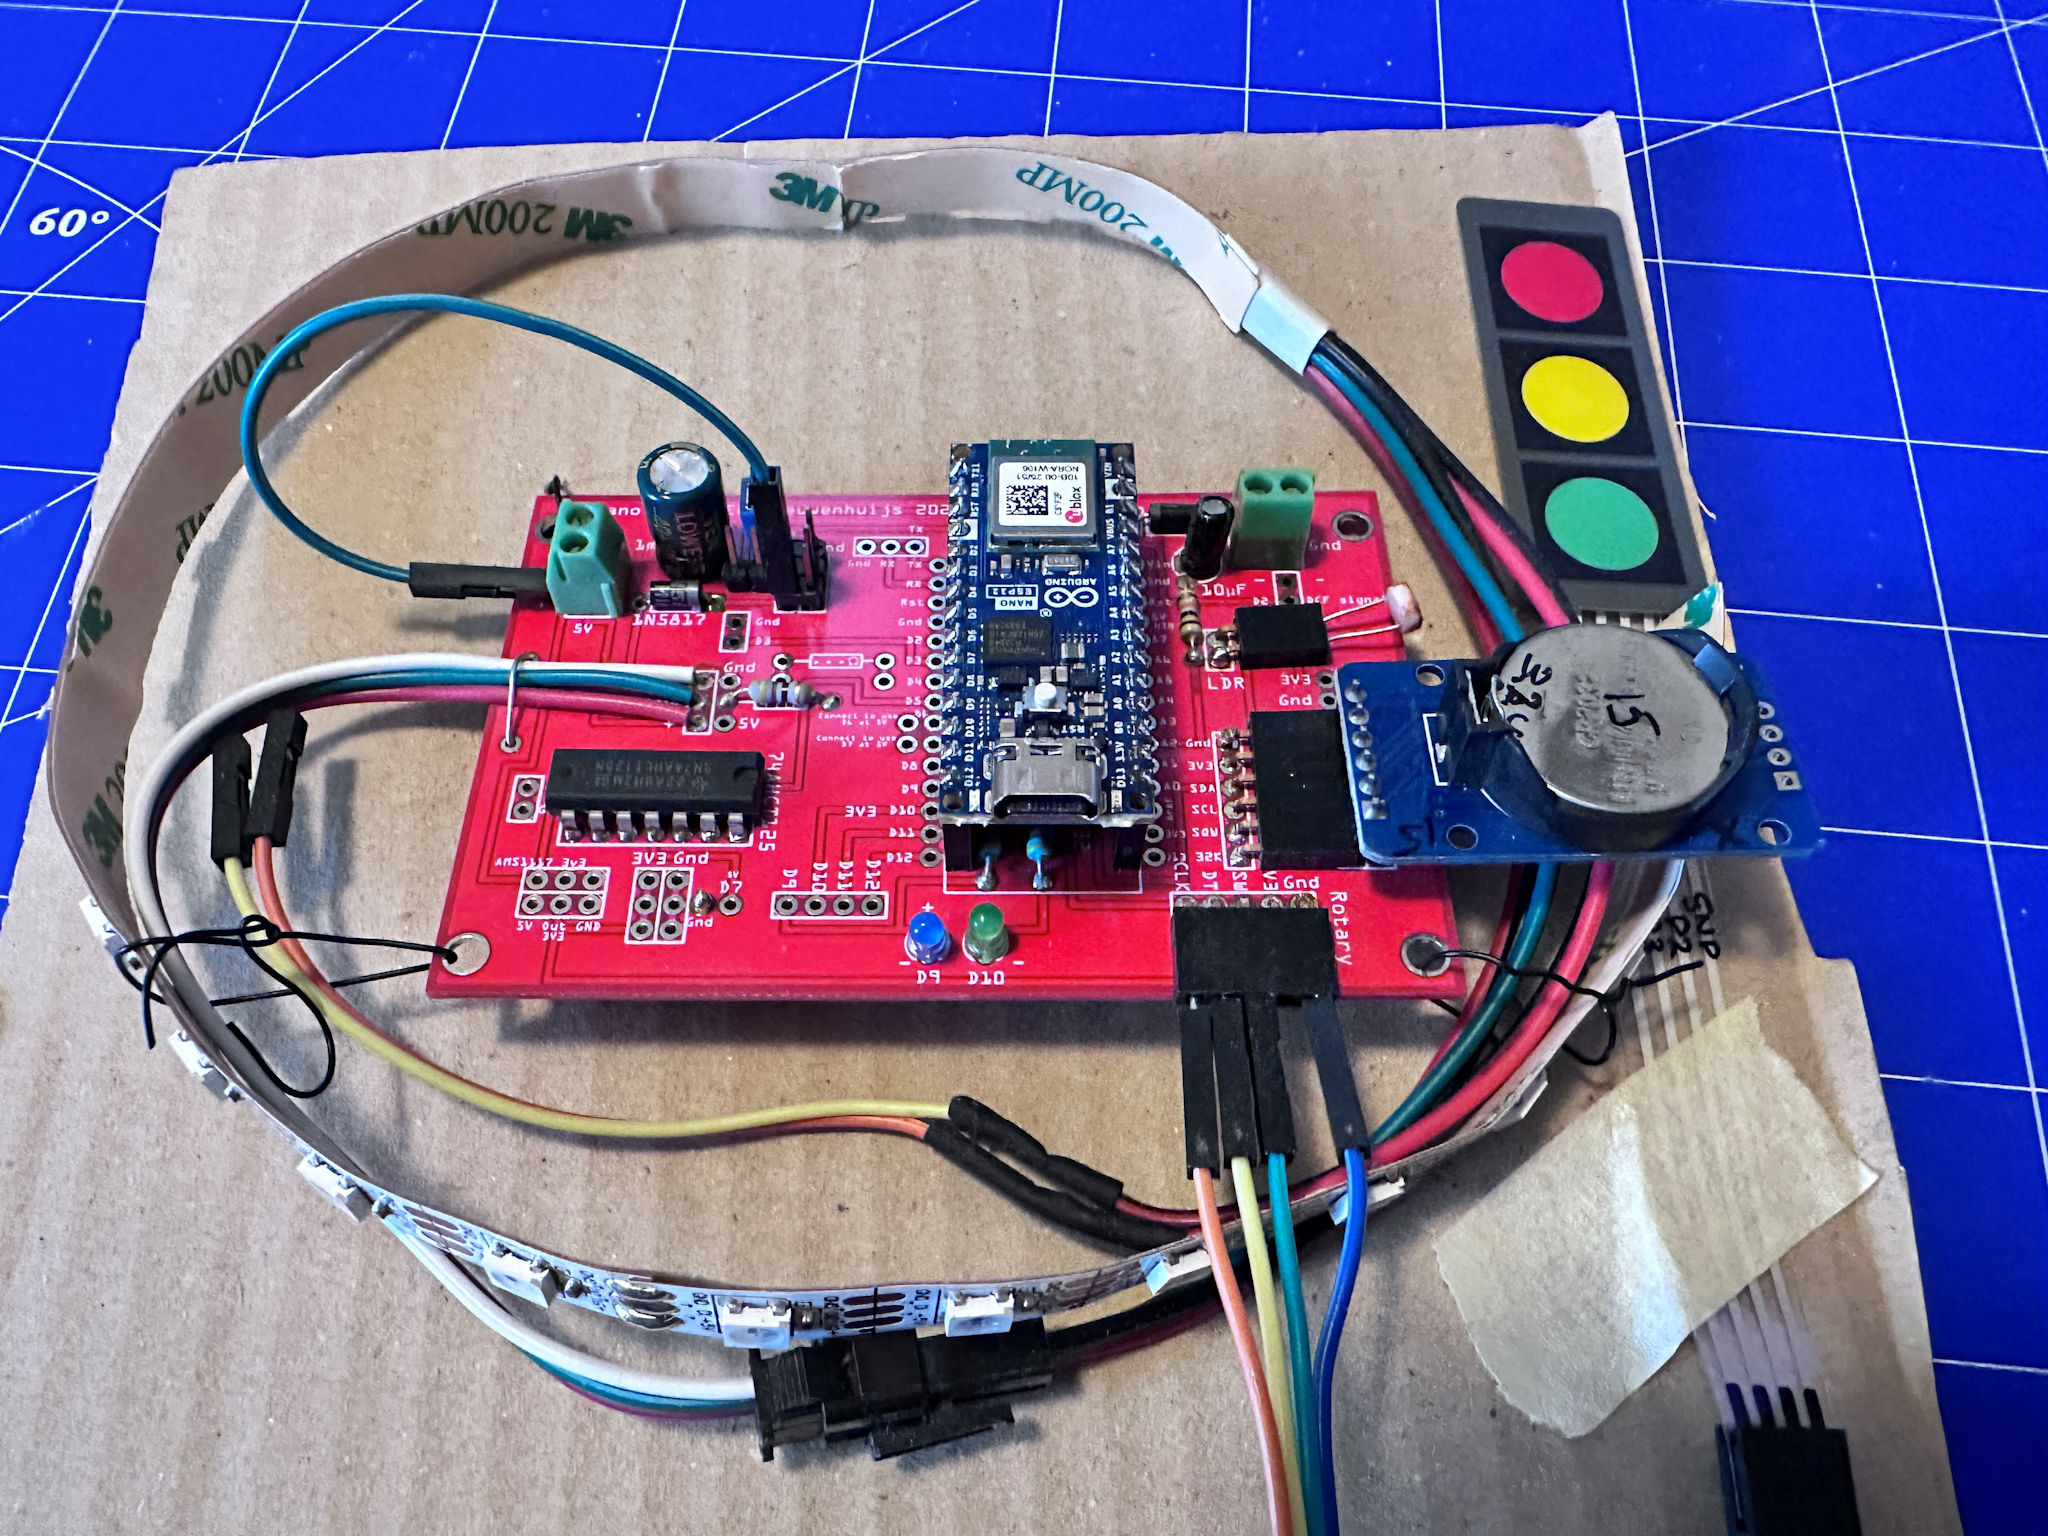
All parts on PCB V04 incliding Membrane keypad.
The large PCB has connections to: (from top right clock wise)
The small PCB has connections to: (from top left clock wise)
The distance between the LEDs on the strip is suitable for making a clock of 25 x 25 cm (60 LEDs/m) or 50 x 50 cm (30 LEDs/m).
You can choose to stick the 144 LEDs of the clock in 12 rows of 12 LEDs or only behind the letter that should light up.
The advantage of the latter is that fewer LEDs are needed and that you have to drill fewer holes in the spacer plate.
But there are many more soldering points, each of which can cause malfunctions.
My experience is that imperfect soldering on the strip may loosens over time, causing malfunctions.
The software has a digital time display option you use 144 (12 x 12) LEDs.
You can choose to cut out the words like IT, WAS, FIVE and so on in a 1 cm thick MDF board with a jigsaw.
Be sure to paint the insides bright white, otherwise the white light will become dingy.
It is better to use foamed PVC white 10 MM RAL 9003. It cuts easily, is white and does not discolour. (Often white paint discolours)
Stick/glue the strips starting from left to right on the odd lines and from right to left on the even lines.
(You have to turn the strip upside down every second row!)
This avoids long data lines going from the right end of the strip to the left end on the next row of a LED strip.
And the software does not have to be corrected for the new positions.
I find it useful to use tinned copper wire.
For example, you solder all 5V connections to the left side of the strip and all GND to the right side of the strip.
To do this, drill a small hole through the plate next to all 5V connections on the left side of the strip and to the GND on the right side
Bend a 90 degree angle, put the wire through the hole and solder the wire to the LED strip.
Place the spacer plate over the LEDs, then a sheet of white paper and finally the word plate.
The ESP32Arduino_WordClockVxxx.ino turns the Nano ESP32 and SK6812 or WS2812 LED strips into a Word clock with connection to a WIFI router and receives the time from a NTP server or a Timesender app.
An user manual in Dutch and English can be found in this repository here
The software can be controlled with Bluetooth on your PC, Android or iPhone/iPad/iMac using a BLE terminal app or with this HTML BLE terminal web page.
Several designs can be selected before compiling. (If you have a word clockface plate, of course.)
Use a word clockface plate design from this repository or use your own and adapt the position of the LEDs in the software.
Select one of the word clock designs
#define NL144CLOCK              // Dutch display for 12 x 12 Front
//#define FOURLANGUAGECLOCK       // Four-language clock with 625 LEDs
//#define NL92CLOCK               // Dutch display for one LED behind every word
//#define UK144CLOCK              // English display for 12 x 12 Front.
//#define FR144CLOCK              // French display for 12 x 12 Front.
//#define DE144CLOCK              // German display for 12 x 12 Front.
...
#define NL144CLOCK -> a 144 LED single language clock. Default language is Dutch. For French, German and English copy the coding from the four-language clock between the NL144CLOCK defines.
Build instruction for the clock in Dutch and English
or here in this repository
#define NLM1M2M3M4L??? -> a ??? LED single language clock with 4 extra LEDs for the minutes and a slightly different design. Many lay-outs are defined.
#define FOURLANGUAGECLOCK-> a 4-language clock with 625 LEDs in a 25 x 25 grid.
Build instruction of 4-language word clock with SK6812 LEDs in UK, NL, DE, FR with Nano Every..
In the libraries.zip are the libraries to compile the software.
Unpack them in your libraries folder.(libraries folder in the folder where your sketches are saved by default)
Download the program folder and compile for Arduino Nano ESP32 using the Espressif core 3.
Libraries update constantly, which may result in incompatibility with this source code over time. Therefore, these libraries are included.
An alternative is to compile the ArduinoOTA sketch that can be found in the Examples of the Arduino IDE.
Upload the OTA-updater in the Nano ESP32 and note the IP-address that is printed in the Serial monitor of the Arduino IDE.
Type this IP-address URL in a browser and enter admin/admin as user and password.
Then upload the .bin file made by the Arduino IDE with Sketch->Export compiled binary.
Or use this one: Uploads .bin files in the ESP32 by using wifimanager.
At the moment of writing (June 2026) the Espressif ESP32 board core V3.3.9 with the Arduino Nano ESP32 selected does compile to a working program when ESP32WordclockV220.ino of a higher version is used. Select the Nano ESP32 board from Arduino in the Arduino IDE. The Arduino ESP32 board with core version 2.0.17/2.0.18, also compiles without errors when using the Adafuit Neopixel library.
There are two compiler pin numbering methods: One method uses the GPIO pin numbering of the ESP32-S3 and the other by Arduino pin numbering.
This code works fine with GPIO pin numbering selected.
The Neopixel library generates an error when this is not selected.
The EdSoftLED library can use both pin numberings and only compiles with Espessif core 3.3.n because it used the RMT functionality to drive the LEDs.
Install Arduino Nano ESP32 board
Board: Arduino Nano ESP32
Partition Scheme: With FAT
Pin Numbering: By GPIO number (legacy)  !! use this when using Neopixel
The clock receives time from the internet when connected to a router.
When a DS3231 time module is attached to the circuit board an internet connection is not required. Select in the menu that the DS3231 is used instead of the NTP time. (J Toggle use DS3231 RTC module) Be aware that DS3231 time is being used also when there is a internet connection.
To connect to the internet the name of the WIFI station and its password must be entered in the clock software to be able to connect to a WIFI router or use the personal hotspot in you mobile.
The name of the WIFI-station and password has to be entered once. These credentials will be stored in memory of the microprocessor.
If the clock software is started without a SSID router name it will start a WIFI station you can connect to.
To make life easy it is preferred to use a phone or tablet and a Bluetooth communication app to enter the WIFI credentials into the clock.
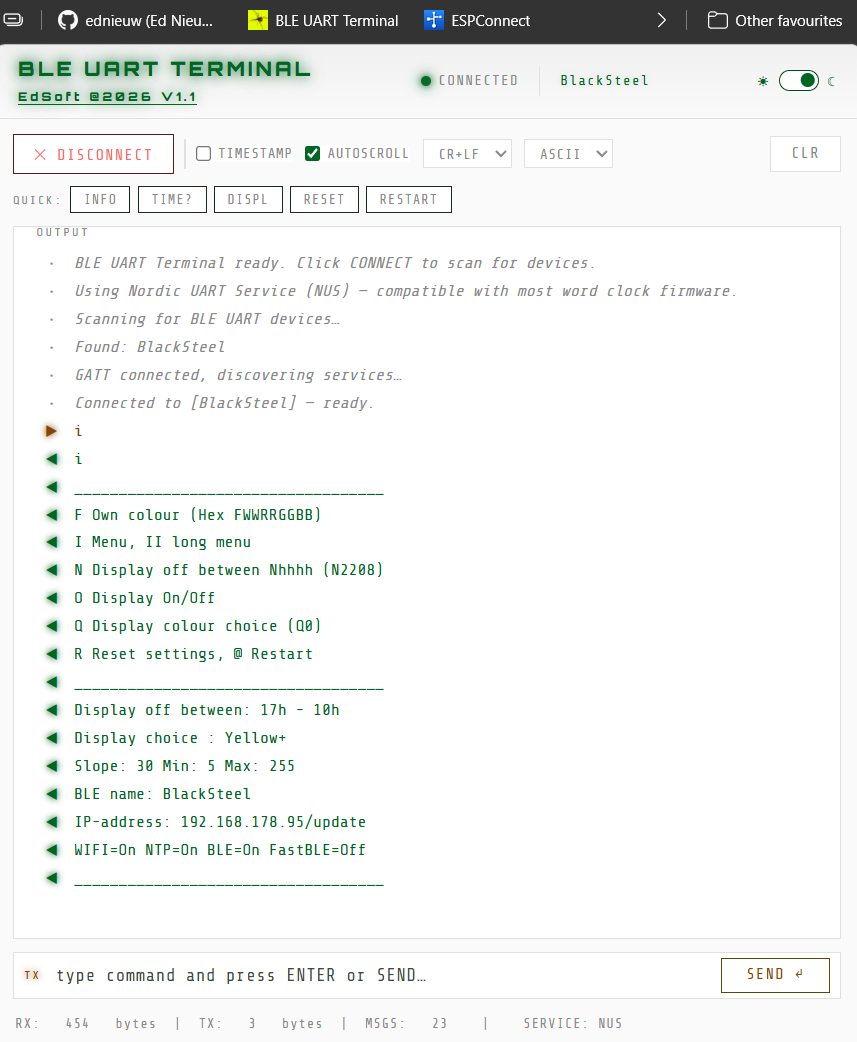
With some browser you can also use this web based BLE HTML from my site
 |
|
| BLE UART HTML from my site | Bluetooth UART serial terminal app |
BLESerial nRF BLE Serial Pro Serial Bluetooth Terminal
Download a Bluetooth UART serial terminal app on your phone, PC, or tablet.
For IOS iPhone or iPad (Buy this one to support me): BLE Serial Pro.
Or the free, less sophisticated app: BLE serial nRF.
Tip: Turn on Fast BLE with option + in the menu for a faster transmission.
For Android use: Serial Bluetooth terminal.
Do not turn on Fast BLE in the menu. (Off = default)
Enter the SSID name and password of your router prefixed with A for the SSID and with an B for the password.
bPassword and press send Optionally
cClockname and press send. Clockname is the name of the clock displayed in the WIFI-router in the list of bluetooth devices in the BLE serial terminal app
If the clock is connected to the internet it will seek contact with a time server. (NTP connection can be turned off in the menu).
The time zone is set to UTC+1 Amsterdam but can be changed in the menu.
To connect to a WIFI network a SSID and password must be entered.
If equipped with a reset button, holding it for two seconds restores the clock to its factory settings.
Bluetooth and WIFI will be turned on.
There are a few methods:
1. Connect the MCU with a serial cable to a PC and use a serial terminal.
I use the Arduino IDE as serial terminal.
Sending the character 'I' for information will display the menu followed with the actual settings of several preferences.
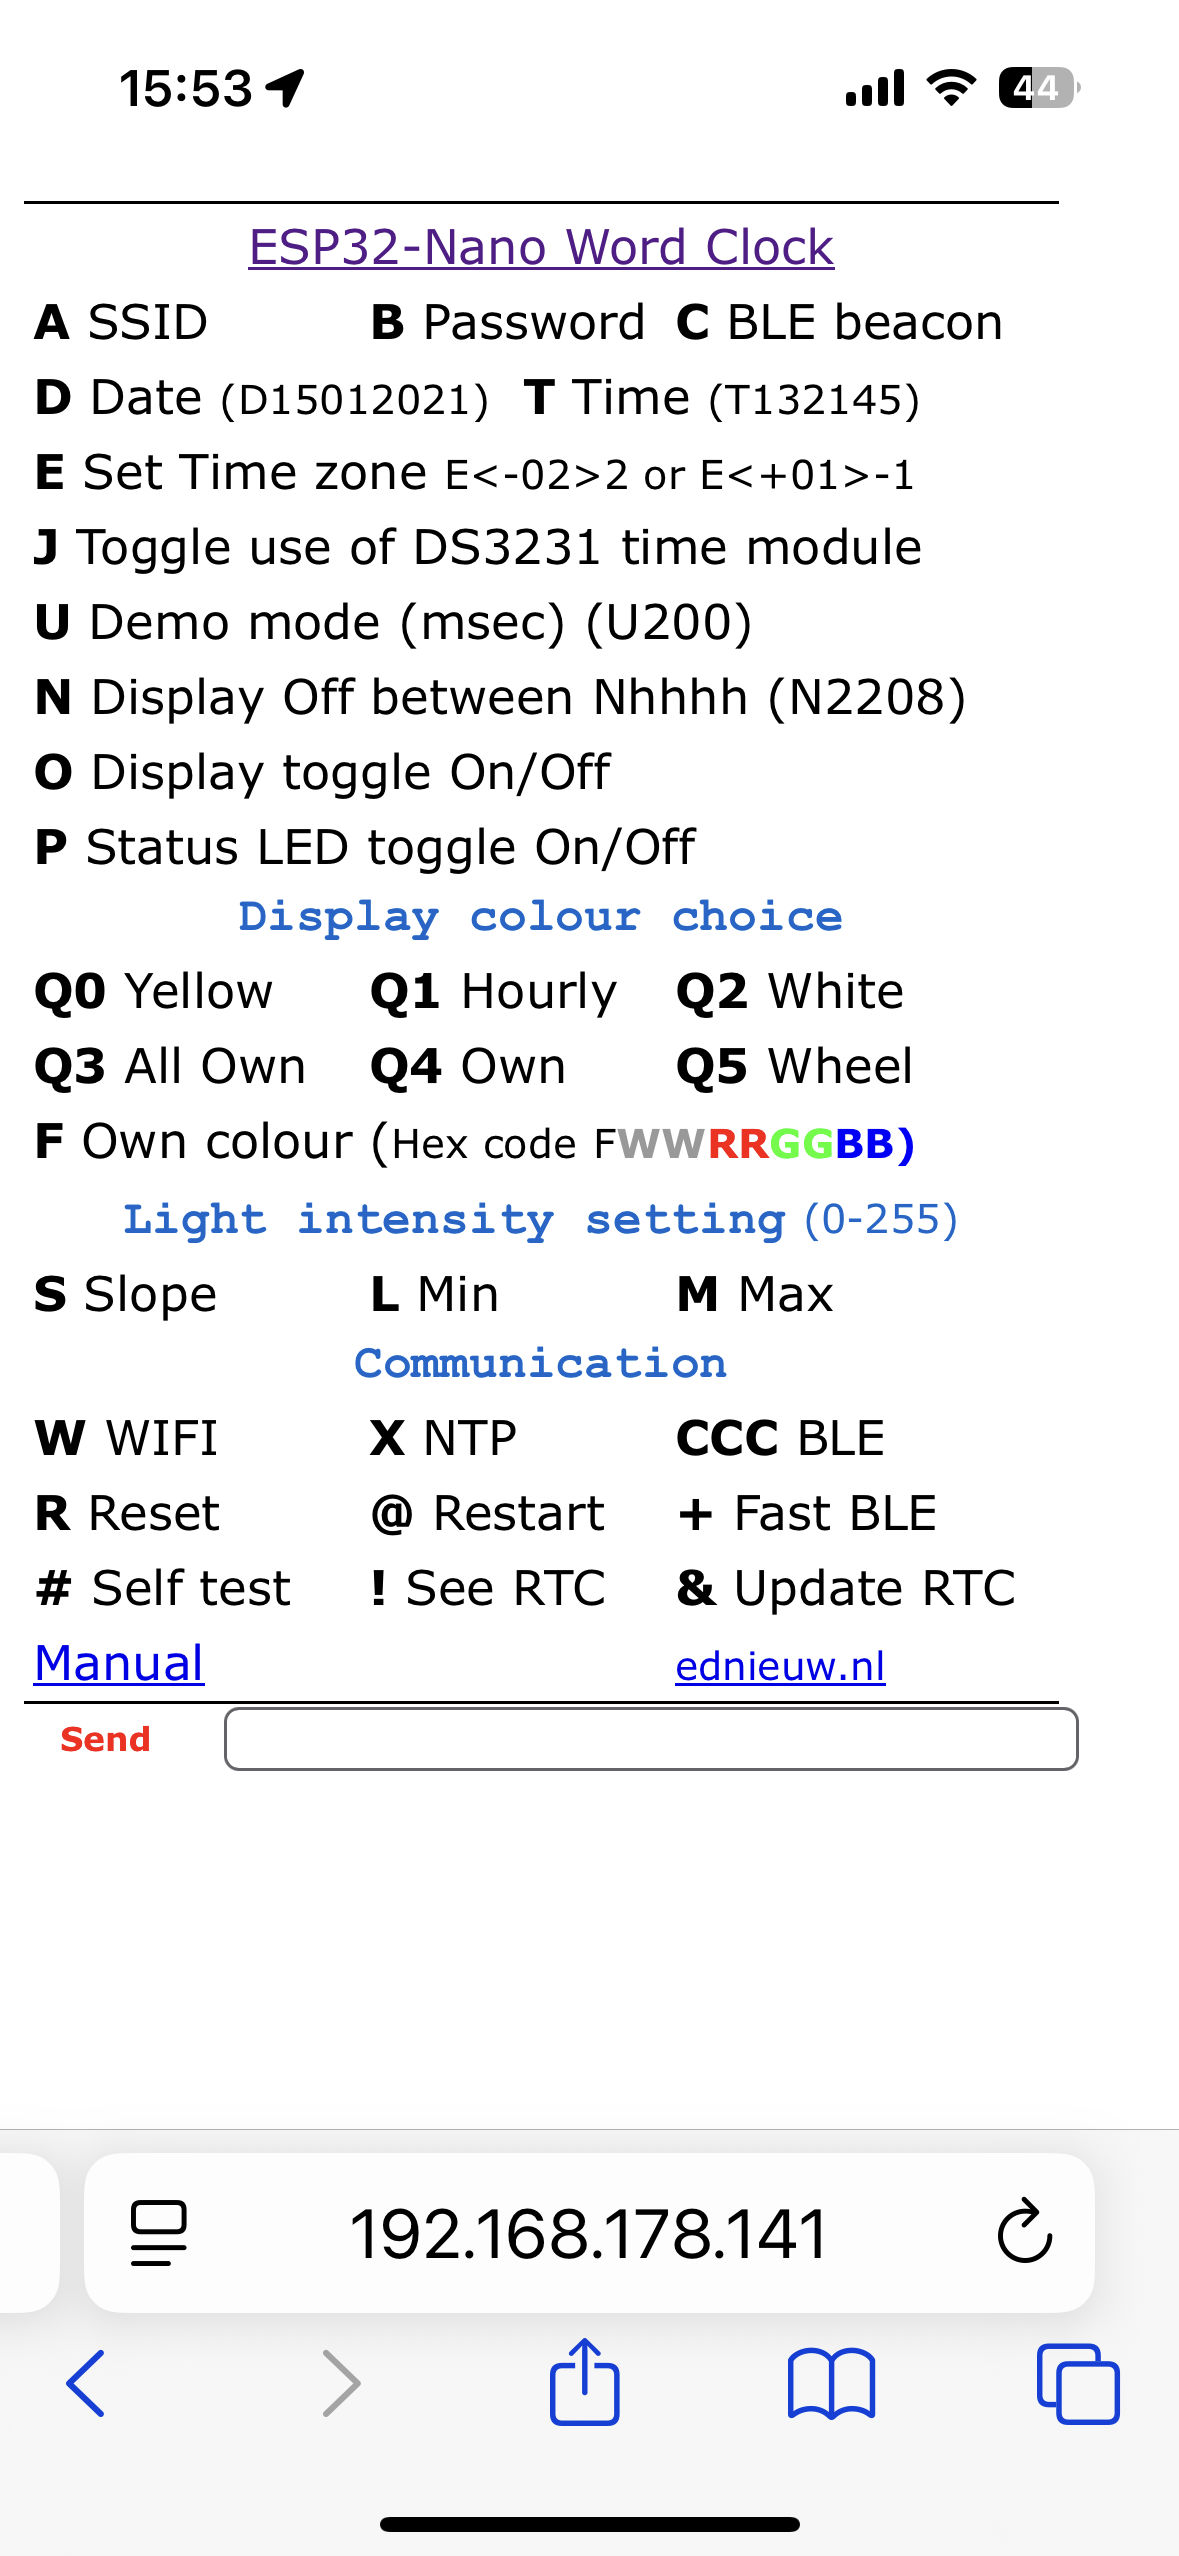 |
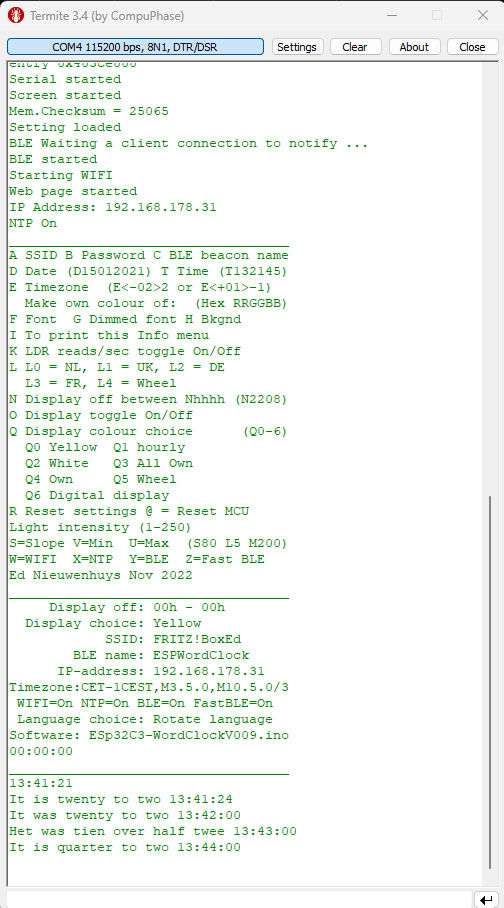 |
| HTML page on iPhone. | Termite terminal on a PC. |
Use the IOS app for iPhone or iPad: BLE Serial Pro.
or the free app BLEserial nRF: https://apps.apple.com/nl/app/bleserial-nrf/id1632235163?l=en-GB
Turn on Fast BLE with option Z in the menu.
For Android use:Serial Bluetooth terminal.
Turn off (default) Fast BLE in the menu.
Start the app and find the MCU in the list of devices and connect to it. You can change it's beacon name in the menu with option C.
In both cases send the character I of Information and the menu shows up.
Enter the first character of the setting you want to change followed with a code.
Some entries just toggle On and Off. Like the W to set WIFI Off or On.
To change the SSID and password:
Amy-ssid and send this command. Eg AFRITZ!Box01 or aFRITZ!Box01.
Starting with an upper or lower case character is an identical instruction in the command string
Then Bmy-passwordand send the password.(for example: bSecret
Cbroadcastname will change to name displayed in the Bluetooth connection list.
If the length of the SSID and/or password is less then 5 characters the WIFI will be turned off automatically. This will speed up startup time if no internet connection is available
Use a length of minimal 8 characters for the password and 3 characters for the SSID.
Check in the menu (third row from the bottom) if WIFI and NTP are on.
If WIFI is connected the LED on the MCU will pulse green.
Enter @ to reset the MCU. It will restart and connections will be made.
To set a time zone, send the time zone string between the quotes prefixed with the character E or e.
See the time zones at the bottom of this page.
For example, if you live in Australia/Sydney send the string: eAEST-10AEDT,M10.1.0,M4.1.0/3
___________________________________
___________________________________
A SSID, B Password, C BLE beacon name
D Date (D15012021), T Time (T132145)
E Timezone (E<-02>2 or E<+01>-1)
F Own, V BKGD color (Fwwrrggbb Fwrgb)
G Scan WIFI networks
H H01 rotary H02 buttons H03/04 remote
} Learn IR remote, + Fast BLE
I Info menu, II long menu
J DS3231 RTC, H05 Time receiver On/Off
K LDR /s, Time K1/min K2/hr K0/Off
N Display off between Nhhhh (N2208)
O Display On/Off, P StatusLED On/Off
Q Display choice (Q0-9), ~ Changing
R Reset settings,  @ Restart
S Slope, L Min, M Max (S50 L5 M200)
Unnn Demo (U200 msec), Y LED test
) HETISWAS  On/Off, ( EdSoft On/Off
#nnn Selftest,  RTC: ! See, & Update
W WIFI, X NTP, Z WPS, CCC BLE
Ed Nieuwenhuijs Jun 2026
___________________________________
Display off between: 22h - 08h
Display choice  : All Own
RandomDisplay:Off, Timestamp: Off
Slope: 50     Min: 5     Max: 25
SSID: FRITZ!BoxEd
BLE name: ESPredPCB
IP-address: 192.168.178.172/update
Timezone:CET-1CEST,M3.5.0,M10.5.0/3
WIFI=On NTP=On BLE=On FastBLE=On
H00=On DS3231=Off TimeReceiver=Off
625 WS2812 LEDs (switch %)
Software: ESP32_WordClockV223.ino
ESP32 Arduino core version: 3.3.8
__________________________________
As mentioned before the clock can be controlled with the WIFI webpage or BLE UART terminal app.
When the clock is connected to WIFI the IP-address is displayed in the menu
Enter this IP-address numbers and dots (for example: 192.168.178.31) in the browser of your mobile or PC where you type your internet addresses (URL).
If the name of your BLE beacon is wordclock (see in the wordclock menu -> BLE name: wordclock)
Enter 'wordclock.local' as URL in the browser. if this does not work install host software: - For Linux, install Avahi (http://avahi.org/). - For Windows, install Bonjour (http://www.apple.com/support/bonjour/). - For Mac OSX and iOS support is built in through Bonjour already.
The menu, left in the picture below will appear. With these menus almost all functionality of the clock can be set, changed, and many more.
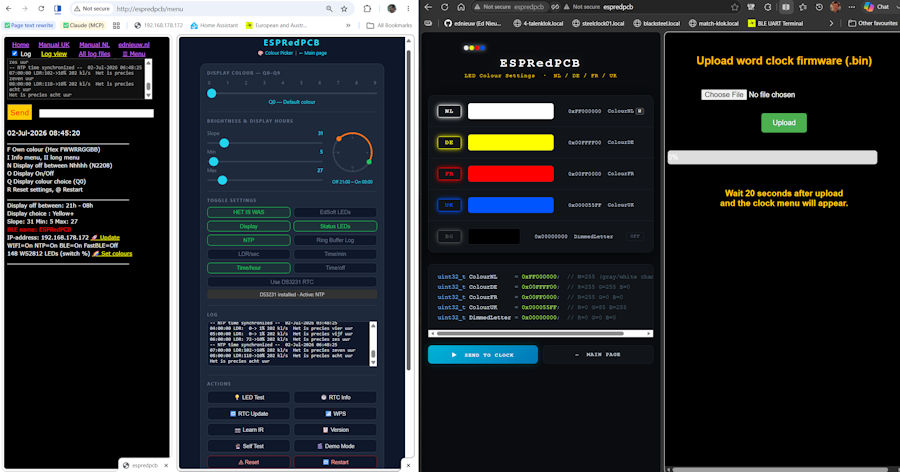
Or open the BLE terminal app. (in some apps you have to press a CONNECT-button).
Look for the WordClock to connect to and connect.
For Apple IOS devices BLE connection can be made with my app BLE Serial pro in the app store .
For Android
nRF UART terminal program and
Serial Bluetooth terminal.
If you see a garbled menu and have FASTBLE turned on then send the character '+' to toggle the FASTBLE off the slower transmission mode.
Settings are set by entering the first character of a command following by parameters if necessary.
For example to set the colours of the characters in the display to white enter: Q2
Set time by entering T130245. (130245 will also work)
Turn off WIFI by sending a W.
Reset the MCU with the character @.
Reset to default setting by send R.
In the BLE connection the SSID and password will be shown.
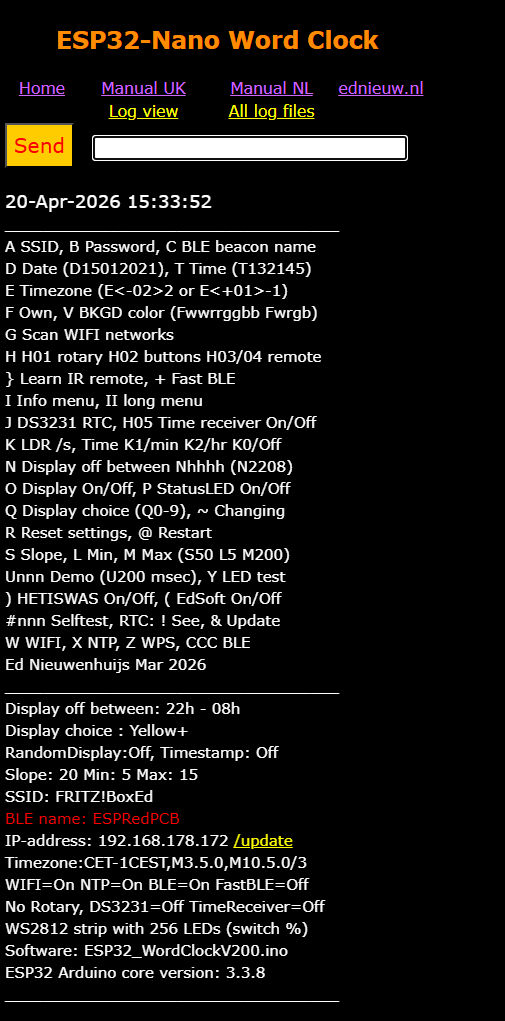 |
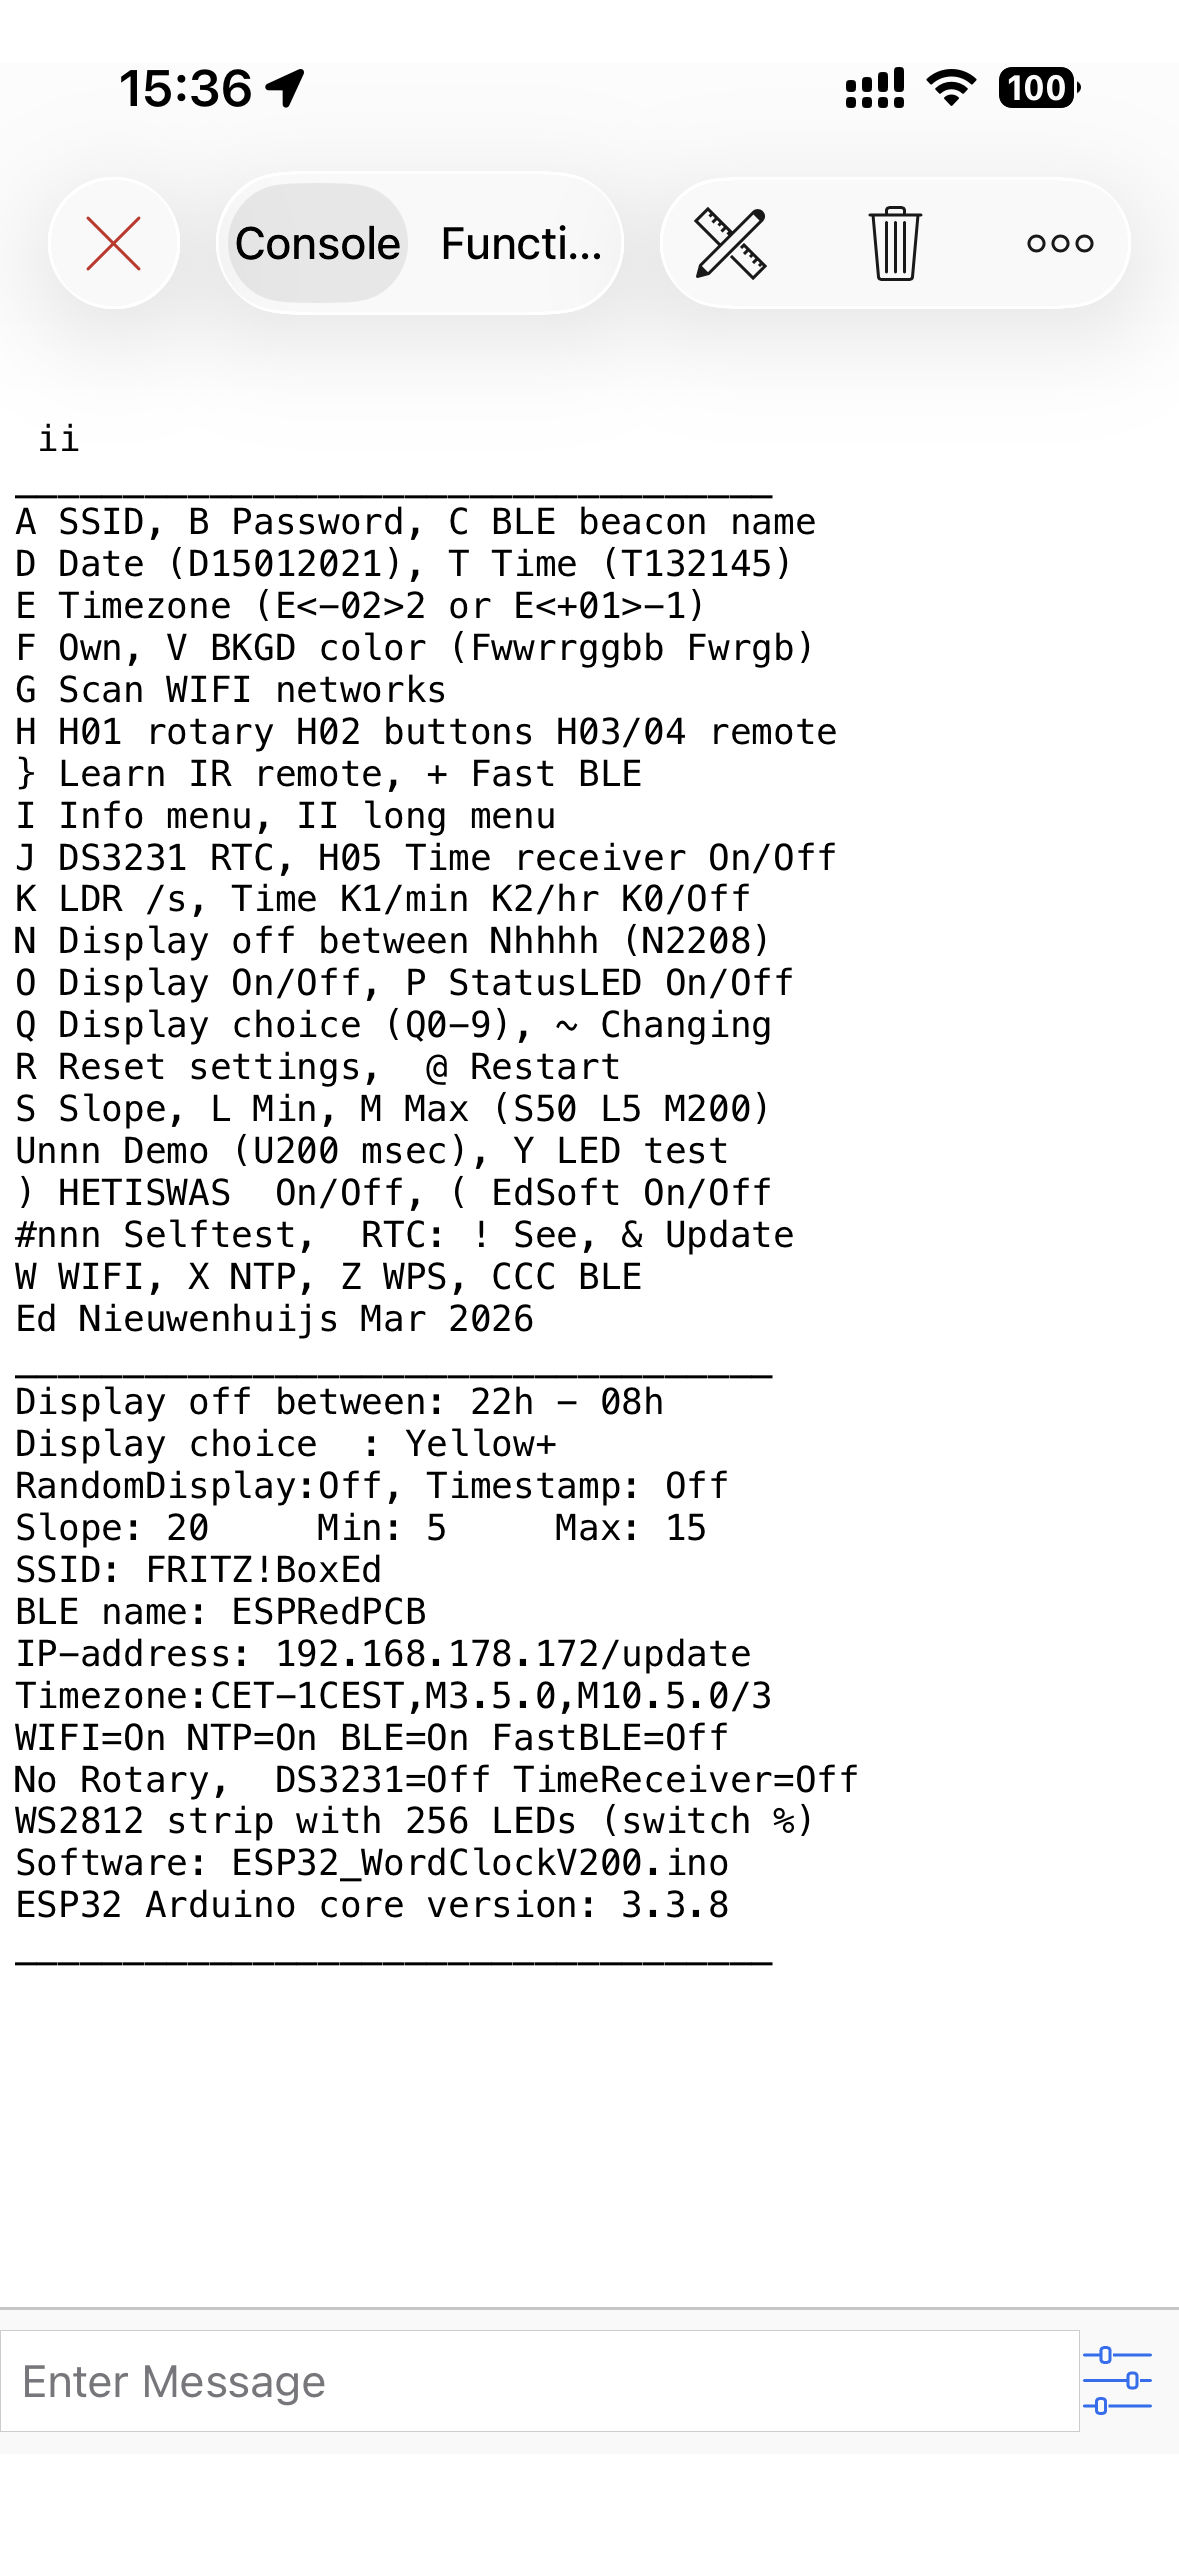 |
| HTML page | BLEserial iPhone menu |
With the menu many preferences can be set.
These preferences are permanently stored in the Arduino Nano ESP32 storage space.
Enter the first character in the menu of the item to be changed followed with the parameter.
For most entries upper and lower case are identical.
With the HTML menu pages many of these entries can be selected with button, sliders or colour palettes.
Software can be updated with a .bin file. A bin files is made in the Arduino IDE from the menu Sketch -> Export compiled binary. In the folder where the sketch was saved several files are placed in the folder "build". The WordFiboBlockVxxx.ino.bin of approx. 1.5 Mb is the file to upload.
Change the name of the SSID of the router to be connected to.
aFRITZ!Box or AFRITZ!Box
Then enter the password. For example: BSecret_pass
and cMywordclock as a name of the BLE beacon that will be shown in your phone. (default after a reset: wordclock )
Restart the MCU by sending @.
Entering CCC or ccc will toggle BLE on or off. Be careful turning it off. When BLE is off the clock can only be controlled with WIFI or the USB serial port.
If not connected to WIFI time and a RTC DS3231 is attached date must be set by hand.
For example enter: D06112022 to set the date to 6 November 2022.
Enter for example T132145 (or 132145 , or t132145) to set time to 45 seconds and 21 minutes past one o'clock.
At the bottom of this page you can find the time zones used in 2022.
For Central Europe the string is: CET-1CEST,M3.5.0,M10.5.0/3
It is a rather complicated string and it is therefore wise to copy it.
Let's pick one if you happen to live here: Antarctica/Troll,"<+00>0<+02>-2,M3.5.0/1,M10.5.0/3"
Copy the string between the " " 's and send it starting with an 'E' or 'e' in front.
E<+00>0<+02>-2,M3.5.0/1,M10.5.0/3
Entering RRR will reset the timezone to Amsterdam CET. You will loose your credentials too with this reset! and have to reenter your SSID and password.
With option Q3 and Q4 from the menu you can set your own colours for the clock to display.
Or press in the HTML menu page de link "🌈 Set colours".
Here the colour of the display can be selected with a colour palalette. When selected the display choice; "Q3 uses you own defined colours" automatically selected.
The format to be entered is hexadecimal, 0123456789ABCDEF or decimal, 0123456789.
The decimal range is made for users that are not familiar with hexadecimal arithmetic.
The hexadecimal command is 2 characters for white followed with two characters for Red followed with two characters for Green and ending with two digits for Blue.
The hexadecimal range is 00-FF, or 0-256 decimal and the decimal range is limited to 0-9.
To colour the characters intense red enter FF0000 prefixed with the character F.
To set intense blue enter: F000000FF or FFF.
To set the dimmed character to dark gray enter for example: F00191919.
You get gray if red, green and blue have the same intensity.
With SK6812 LEDs the extra white LED can be used besides the three RGB LEDs in the same housing.
For example: F8800FF00 is 50% white with 100% green.
Scan available Wi‑Fi networks (prints SSIDs found). This option does not work from the menu web page.
Turning on will also Turn off NTP and on use of DS3231. Check DS3231 and NTP setting when turning off (H00)
The options are:
H01 Rotary encoder
H02 Keypad
H03 Large IR-remote with nummeric UP DOWN LEFT RIGHT ON/OFF and POWER
H04 Tiny IR-remote with six buttons
H05 Turn On/Off the BLE time receiver.
When enabled, the device listens for time sent by a BLE time sender app running on a nearby phone or PC and uses that to set its clock.
Compatible senders:
Start learning the keys of a new infrared remote.
Print the menu.
i prints the short info menu.
ii prints the extended menu (long help).
When DS3231 is enabled, NTP may be turned off. Use option X to toggle NTP if needed.
The flashing orange status LED on the board will turn off when the DS3231 time is used.
Prints the LDR-readings and the calculated intensity output. K1 Turn On and Off the display of time every minute. K2 Turn On and Off the display of time every hour. In the long menu the K1 or K2 status is shown. If time is printed every minute or hour the log buffer fills up very fast. If time is not printed more revelant info remains in the logging.
With N2208 the display will be turned off between 22:00 and 08:00.
Toggles the display off and on.
Toggle status LEDs on the board On/Off.
Q0 will show the time with yellow words., HETISWAS changing.
HET will change from green to red via yellow in an hour and IS/WAS with change from green to red in a minute.
Q1 will show every hour another colour.
Q2 shows all the texts white.
Q3 uses you own defined colours.
Q4 uses you own defined colours with HETISWAS changing.
Q5 will follow rainbow colours every hour.
Q6 is the digital clock if you have used 12x12 = 144 LEDs in the clock.
Q7= Hourly colour, HETISWAS changing.
Q8= Rainbow colour changing in a minute.
Send an 'I' to display the latest's settings in the menu.
R will set all preferences to default settings. The SSID and password, timezone, the LED-strip type and rotary/IR usage will be kept.
RRR will clear SSID, password, set Time zone to Amsterdam (CET-1) and turn WIFI, NTP and BLE on.
RRRRR is a total reset. A combination of R and RRR.
A total reset can also be achieved with a reset button connected to D6 or D7. If no rotary encoder is used, the rotary encoder pins D2, D3, and D4 can also serve this purpose.
Enter U followed with the duration of a second in milli seconds.
M200 (200 millisecond) will speed up the clock 5*60 times.
Sending an U will turn off the demo mode or if not in demo mode start demo mode with 800 ms/min.
With this option you can set the colour and intensity of the LEDs that are normally not turned on.
This option is usefull when there is light leakage between the characters or to highlight the characters turned off.
When this option is used the minimal light intensity is set to 50 bits to avoid that the background light with get off during the evening.
50 bits is 20% of the max intensity. When you enter a background of say hexadecimal 10 (=16 decimal) the 20% of 16 = 3 bits and that is almost off.
The format to be entered is hexadecimal, 0123456789ABCDEF or decimal, 0123456789.
The decimal range is made for users that are not familiar with hexadecimal arithmetic.
The hexadecimal command is 2 characters for white followed with two characters for Red followed with two characters for Green and ending with two digits for Blue.
The hexadecimal range is 00-FF, that is a decimal range of 0-255 and the decimal range is limited to 0-9.
To colour the characters weak red enter V00110000 or decimal V0100.
To set weak blue enter: V00000011 or V0001 decimal.
With the command V the background light is turned off and minimal light intensity to 10
To test the functionality of the LEDs.
| To control the light intensity three parameters can be set. The values ranges between 0 and 255. The minimal light intensity is to avoid that the display turns completely off when it is dark. It also prevents flickering when the input value is very low, like 2 and 3 bits. Values ranging between 5 and 20 are suggested. When no LDR is attached, the Min value can be set to 255. The maximum light intensity is 255 bits for 100% intensity. The Slope (sensitivity) controls the speed at with the maximum value is reached. It multiplies the reading as a percentage. So, entering 100 is a multiplication by one. The placement and sensitivity of your LDR can be adjusted with this parameter Slope. |
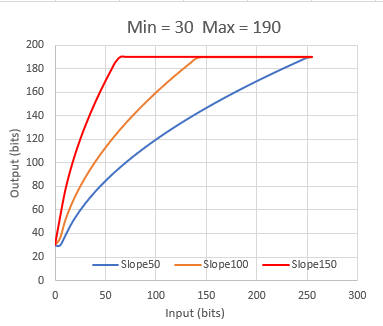 The effect of the value of the slope on the light intensity of the LEDs or display. |
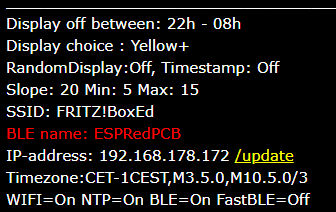
W=WIFI, X=NTP, Y=BLEToggle WIFI, NTP and BLE on and off.Sending the character will toggle it on or off. At the bottom of the long menu (ii) the state is printed. |
 |
The BLE UART protocol sends default packets of 20 bytes. Between every packet there is a delay of 50 msec.
The IOS BLEserial app, and maybe others too, is able to receive packets of 80 bytes or more before characters are missed.
With most apps you will see these will truncate the long strings of the menu.
Then turn off Fast BLE.
Option Z toggles between the long and short packages.
~ will start the changing display mode option. ~ or ~1 will change the dislay mode every minute and ~2 every hour. ~ or ~0 turns the option off. It is convenient for testing and demonstrations.
! will display the NTP, RTC and DS3231 time as they are stored in the clock in the clock. The DS3231 time module must be installed and in use to show a realistic time. Same as & option but this option will not update from the internet NTP server but only shows the time.
Sending a # will start the clock self test. This is convenient to check if all the words in the display are functioning.
The time of a minute is reduced to 0.9 seconds (900 milli seconds).
#nnnn where nnnn is the delay between minutes in milliseconds.
With this option the used LED strip can be changed. The clock is equipped with on of these to types of LED strips. A Reset of all settings by sending a R in the menu will not change this LED strip selection.
Shows a fire on the display in some clocks with a 12 x12 LED-matrix design installed
The clock can optionally be equipped with an extra logo text.
IT/IS/ WAS is always off
@ will restart the MCU. This is handy when the SSID, et cetera are changed and the program must be restarted. Settings will not be deleted.
& will get the NTP time immediately from the internet and stores it in the RTC clocks. This option is convenient to force the clock to get the proper NTP time. In other cases the program will check the time running in the clock and on the NTP server so now and then and update the RTC clocks. The DS3231 time module must be installed and being used to show a realistic time.
= will print the values stored in the permanent memory of the Arduino.
Enter the time as 152300 hhmmss. Same as T152300 Changing date and time only works when a DS3231 RTC module is attached.
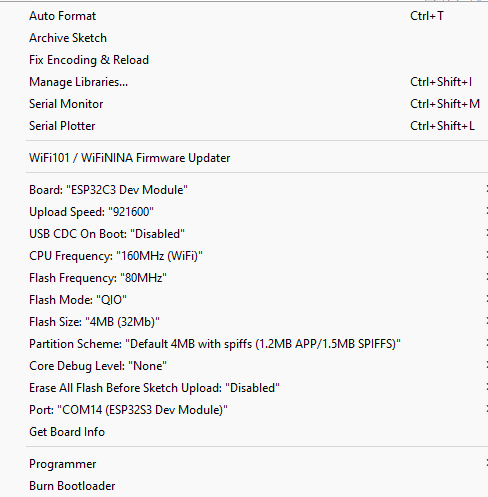
The settings of the Arduino Nano ESP32 board is as follows.
Remember to install the ESP32 boards as explained above.
The program uses the following standard libraries.
//------------------------------------------------------------------------------              //
// ESP32 Includes defines and initialisations
//-------------------------------------------
                      #if ESP_ARDUINO_VERSION >= ESP_ARDUINO_VERSION_VAL (5, 2, 0)            // Use EdSoftLED with ESP32 compiler.
#define USEEDSOFTLED  // Use EdsoftLED >= V1.7.0 for SK6812. Saves 200-500 bytes compared with NeoPixel. NeoPixel is OK
                      #endif
                      #ifdef USEEDSOFTLED
#include <EdSoftLED.h>         // https://github.com/ednieuw/EdSoftLED for LED strip WS2812 or SK6812
                      #else
#include <Adafruit_NeoPixel.h> // https://github.com/adafruit/Adafruit_NeoPixel  *** USE GPIO NUMBERING and compile By GPIO number (legacy)
                      #endif
#include <Preferences.h>
#include <NimBLEDevice.h>      // For BLE communication. !!!Use NimBLE version 2.x.x  https://github.com/h2zero/NimBLE-Arduino
#include <WiFi.h>              // Used for web page
#include <esp_sntp.h>          // for NTP
#include <esp_wps.h>           // For WPS
#include <ESPAsyncWebServer.h> // Used for webpage  https://github.com/ESP32Async
#include <Update.h>            // For Over-the-Air (OTA)
#include <ESPmDNS.h>           // To show BLEname in router
#include <DNSServer.h>         // For the web page to enter SSID and password of the WIFI router
#include <Wire.h>              //
#include <RTClib.h>            // Used for connected DS3231 RTC // Reference https://adafruit.github.io/RTClib/html/class_r_t_c___d_s3231.html
#include <Encoder.h>           // For rotary encoder
#include <Keypad.h>            // For 3x1 membrane keypad instead of rotary encoder by Mark Stanley & Alexander Brevig
#include <IRremote.hpp>        // IR remote control
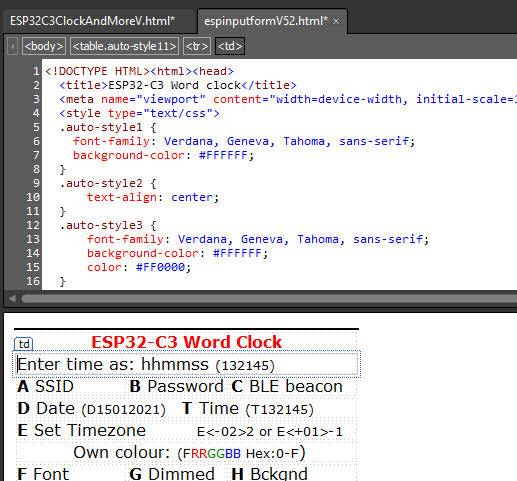
Webpage.h is included in the program as a TAB in the IDE. It contains the web page to display in the browser.
I made the web page in the free 'Microsoft Expression Web 4'. It is not maintained anymore but has more than enough functionalities for our purposes.
Notepad++ or an AI are also good alternatives
To copy the code from the MS-Expression:
At the bottom line of the window of MS-Expression click 'Split'.
In the upper half the raw HTML Code is displayed and in the bottom half the
Design window.
Copy in the Code window all the HTML code
Go to the Arduino IDE and paste it in the webpage.h TAB between:
R"rawliteral( ... and ...
)rawliteral";
Or copy the the code from the webpage.h into
MSexpression Code area and redesign the page as you like
A long list if definitions and initialisations follows.
I am not a fan of passing all the variables to and from functions and like to keep them global in one program list.
If you write a program with other people, it is good practice not to use too many globals, but this program is in one large listing, for the same reason to keep it simple.
I grouped all the variables per application to keep track where they are used.
With a simple find it is easy in this one great listing to find the back.
To print the time as text and colour with the proper LEDs or characters, the words and its position in a string of LEDs or text are defined.
The defines executes the function ColorLeds with its proper parameters.
Further in the program in the function void Dutch(void), void English(void) et cetera it becomes clear why these defines are so useful and handy.
The definitions are placed in the TAB "ClockFaces.h"
 ...
#define PRECIES ColorLeds("precies", 16, 22, LetterColor);
#define MTIEN   ColorLeds("tien", 25, 28, LetterColor);
#define KWART   ColorLeds("kwart", 32, 36, LetterColor);
#define VOOR    ColorLeds("voor", 38, 41, LetterColor);
...
This is the initialisation of the storage area to store the struct EEPROMstorage.
The Struct with all its settings is saved in one command to permanent memory or SD
Preferences FLASHSTOR;
 ...
struct EEPROMstorage { // Data storage in EEPROM to maintain them after power loss
byte DisplayChoice = 0;
...
char BLEbroadcastName[30]; // Name of the BLE beacon
char Timezone[50];
int Checksum = 0;
} Mem;
...
The variables are addressed with a short name Mem.
For example Mem.DisplayChoice = 3;
The Struct EEPROMstorage is stored with the function StoreStructInFlashMemory and retrieved with the function GetStructFromFlashMemory
The menu displayed in the serial monitor and BLE app is defined here.
// Menu
//0        1         2         3         4
//1234567890123456789012345678901234567890
const char *menu[] = {
"A SSID B Password C BLE beacon name",
"D Date (D15012021) T Time (T132145)",
...
"W=WIFI, X=NTP, Y=BLE, Z=Fast BLE",
"Apr 2026" };
The Setup happens here:
//--------------------------------------------
// ARDUINO Setup
//--------------------------------------------
void setup()
{
Serial.begin(115200); Tekstprintln("Serial started"); // Setup the serial port to 115200 baud //
...
...
msTick = millis();
}
The loop is kept almost empty and the program starts in Every SecondCheck.
There is nothing in this program that should be executes every millisecond or less
//--------------------------------------------
// ARDUINO Loop
//--------------------------------------------
void loop()
{
 Loopcounter++;
 if (Demo)            Demomode();
 else if(FireDisplay) FireMode();
 else                 EverySecondCheck();
 CheckDevices();
}
The following routines check if something must happen every second, minute, hour and day.
This flow handling of the program keeps the processor for 99% free for other uses.
In this program that is almost nothing but for other purposes this can be needed.
In the serial monitor the number of loops per second is printed. This can be handy to check if the program spends too much time elsewhere in the program. At the moment (V056) of writing it is around 200,000 l/s.
//--------------------------------------------                //
// COMMON Check connected input devices
//--------------------------------------------
void CheckDevices(void)
{
 CheckBLE();
 SerialCheck();
 CheckWIFIcommand();
 if (Mem.TimeReceiver) CheckTimeReceiverClient();
 if (Mem.UseRotary==1) RotaryEncoderCheck();
 if (Mem.UseRotary==2) Keypad3x1Check();
 if (Mem.UseRotary==3 || Mem.UseRotary==4) IrReceiverDecode();
 if (ntpJustSynced) CheckandPrintNTPsynced();
                                  #ifdef ONEWIREKEYPAD3x4
 OnewireKeypad3x4Check();
                                  #endif  //ONEWIREKEYPAD3x4
                                  #ifdef ONEWIREKEYPAD3x1
 OnewireKeypad3x1Check();
                                  #endif  //ONEWIREKEYPAD3x1
}
//--------------------------------------------
// CLOCK Update routine done every second
//--------------------------------------------
void EverySecondCheck(void)
{
 static int Toggle = 0;
 uint32_t msLeap = millis() - msTick;
 if (msLeap >999)                                              // Every second enter the loop
 {
...
if (timeinfo.tm_min != lastminute) EveryMinuteUpdate();        // Enter the every minute routine after one minute
...
}
//--------------------------------------------
// CLOCK Update routine done every minute
//--------------------------------------------
void EveryMinuteUpdate(void)
{
...
if(timeinfo.tm_hour != lasthour) EveryHourUpdate();
}
//--------------------------------------------
// CLOCK Update routine done every hour
//--------------------------------------------
void EveryHourUpdate(void)
{
...
if (timeinfo.tm_mday != lastday) EveryDayUpdate();
}

//--------------------------------------------
// CLOCK Update routine done every day
//--------------------------------------------
void EveryDayUpdate(void)
{
...
}
//--------------------------------------------                                                //
// COMMON Update routine for the status LEDs
//--------------------------------------------
void UpdateStatusLEDs(int Toggle)
{
 if(Mem.StatusLEDOn)
   {
    SetStatusLED((Toggle && WiFi.localIP()[0]==0) * 20,
                 (Toggle && WiFi.localIP()[0]!=0) * 20 ,
                 (Toggle &&      deviceConnected) * 20);
    SetPCBLED09( Toggle * 10);                                                                // Left LED
    SetPCBLED10((!Toggle) * 10);                                                             // Right LED
    SetNanoLED13((!Toggle) * (!Mem.UseDS3231 * 50));                                         // LED on ESP32 board. IF DS3231 in use then it is off
   }
   else
   {
    SetStatusLED(0, 0, 0);
    SetPCBLED09(0);                                                                           //
    SetPCBLED10(0);                                                                           //
    SetNanoLED13(0);
   }
}
Update the LEDs on the Nano ESP32 and the PCB.
On the Nano analogWrite(LED_RED, 512); is OFF and analogWrite(LED_RED, 0); is ON
When compiling with Espressif ESP32 core 3.x.x the resolution of the of the RMT channel is raised from 8 -> 10 bits.
This prevents that the LED does not turn off completely when compiling with core 3. ( 8191 = 10^2)
analogWrite(LED_RED, Red == 0 ? 8191 : (512 - Red));
//--------------------------------------------
// COMMON Control the RGB LEDs on the Nano ESP32
//--------------------------------------------
void SetStatusLED(int Red, int Green, int Blue)
{
 analogWrite(LED_RED,   Red   == 0 ? 8191 : (512 - Red));
 analogWrite(LED_GREEN, Green == 0 ? 8191 : (512 - Green));
 analogWrite(LED_BLUE,  Blue  == 0 ? 8191 : (512 - Blue));
}
//--------------------------------------------
// COMMON Control orange LED D13 on the Arduino
//--------------------------------------------
void SetNanoLED13(int intensity) {analogWrite(secondsPin, intensity);}
//--------------------------------------------
// COMMON Control the RGB LED on the PCB
//--------------------------------------------
void SetPCBLED09(int intensity) {analogWrite(PCB_LED_D09, intensity);}
void SetPCBLED10(int intensity) {analogWrite(PCB_LED_D10, intensity);}
Control the color and intensity of the LED on the boards in one command
//
--------------------------------------------
// CLOCK Control the LEDs on the ESP32
// 0 Low is LED off. Therefore the value is inversed with the ! Not
//--------------------------------------------
void SetStatusLED(bool Red, bool Green, bool Blue)
{
Check for serial input from the serial monitor and pass the command to ReworkInputString()
//--------------------------------------------
// Common check for serial input
//--------------------------------------------
void SerialCheck(void)
{
...
ReworkInputString(SerialString); // Processes the inputstring in the menu
...
}
Restore all the default values.
//-------------------------------------
// Common Reset to default settings
//--------------------------------------
void Reset(void)
{
 Mem.Checksum         = 25065;
 Mem.DisplayChoice    = DEFAULTCOLOUR;
 Mem.OwnColour        = green;
 Mem.DimmedLetter     = black;
 Mem.BackGround       = black;
...
 StoreStructInFlashMemory();
 GetTijd(false);
 SWversion();
 Displaytime();Tekstprintln("");
}

 }
 ```

Common print routines.<br>

To keep all the print commands in one places it is easy to change these routines for other boards with a different 'slang'. <br>
```cpp
//--------------------------------------------
// Common common print routines
//--------------------------------------------
void Tekstprint(char const *tekst)    { if(Serial) Serial.print(tekst); SendMessageTimeReceiver(tekst); SendMessageBLE(tekst); AddLog(tekst);}
void Tekstprintln(char const *tekst)  { snprintf(sptext, sizeof(sptext),"%s\n",tekst); Tekstprint(sptext); }
void Tekstprintf(const char* fmt, ...)
{ va_list args; va_start(args, fmt); vsnprintf(sptext, sizeof(sptext), fmt, args); va_end(args); Tekstprint(sptext);}

void Tekstprintlnf(const char* fmt, ...)
{ va_list args; va_start(args, fmt); vsnprintf(sptext, sizeof(sptext), fmt, args); va_end(args);  Tekstprintln(sptext);}
The setup of storage space and control of the validity of the settings.
In the checksum is invalid a reset() will restore the default settings
//--------------------------------------------
// Common Init and check contents of EEPROM
//--------------------------------------------
void InitStorage(void)
Store and retrieve the settings from SPIFFS or SD or EEPROM. The several possibilities are stored here. EEPROM becomes outdated but still works.
--------------------------------------------
// COMMON Store mem.struct in FlashStorage or SD
//--------------------------------------------
void StoreStructInFlashMemory(void)
{
}
//--------------------------------------------
// COMMON Get data from FlashStorage Preferences.h
//--------------------------------------------
void GetStructFromFlashMemory(void)
{
}
SWversion() prints the menu and the settings of several preferences.
PrintLine() prints the horizontal lines in the menu.
//--------------------------------------------
// COMMON Version info
//--------------------------------------------
void SWversion(void)
{
#define FILENAAM (strrchr(__FILE__, '\\') ? strrchr(__FILE__, '\\') + 1 : __FILE__)
PrintLine(35);
for (uint8_t i = 0; i < sizeof(menu) / sizeof(menu[0]); Tekstprintln(menu[i++]));
...
PrintLine(35);
}

void PrintLine(byte Lengte)
{... }
Get the commands from the strings entered in the serial monitor, Bluetooth or the webpage and perform the command in an action.
The menu letters are almost used but it possible to distinguish between lower and uppercase when more commands are needed.
(That is why there is no conversion to UpperCase or LowerCase).
/--------------------------------------------
//  COMMON Input from Bluetooth or Serial
//--------------------------------------------
void ReworkInputString(String InputString)
{
....
  int len = InputString.length();
  switch(toupper(InputString[0]))
   {
    case 'A':
      if(len > 4 && len < 30)
....
Read the LDR and divide it with 16 to get the values from 0 - 4096 between 0 and 255.
Not all boards has a 12 bit AD converter like.
//--------------------------------------------
// LDR reading are between 0 and 255.
// ESP32 analogue read is between 0 - 4096 --   is: 4096 / 8
//--------------------------------------------
int ReadLDR(void) {  return analogRead(PhotoCellPin)/16;}
Here we print and colour the characters in the display or light up to proper LEDs in a String of RGB(W) LEDs.
The #define executes this functions with the proper parameters for every language and prints the texts in the serial connections.
#define QUARTER ColorLeds("quarter", 32, 38, LetterColor);
//--------------------------------------------    /
 / LED Set color for LED.
//--------------------------------------------
void ColorLeds(char const *Texkst, int FirstLed, int LastLed, uint32_t RGBColor)
{  }
Every display or strip uses other commands to regulate the brightness. Therefore for all LED/Display commands a function.
//----------------------------------------------
// LED Set brightness of backlight
//------------------------------------------------
void SetBrightnessLeds(byte Bright)
{
 SetBackLight(Bright);                        // Set brightness of LEDs
}
A place to turn off all LEDs or clear the display
/--------------------------------------------
// LED Clear the character string
//--------------------------------------------
void LedsOff(void)
Here the colours are set for the characters.
It is also used to change the colours of HET IS WAS used in some display choices
//--------------------------------------------  <br>
// LED Set second color <br>
//-------------------------------------------- <br>
void SetSecondColour(void) <br>
{
...
 MINColor = FuncCRGBW(15 + timeinfo.tm_min * 4, 255 - timeinfo.tm_min * 4, 0, 0);
 SECColor = FuncCRGBW(15 + timeinfo.tm_sec * 4, 255 - timeinfo.tm_sec * 4, 0, 0 );
                                                                                              // Light up  IS or WAS with the proper colour
switch (Mem.DisplayChoice)
  {
    case DEFAULTCOLOUR: LetterColor = C_YELLOW;
<br>
...
Subroutine for the Self test of the clock. Default there is a 900 ms delay.
//------------------------------------
// CLOCK Self test sequence
//--------------------------------------
void Selftest(void){Selftest(900);}
void Selftest(int Delayms)
{
 GetTijd(true);                                                                                  // Prints time in Serial monitor
 LedsOff();
...
}
Displaytime() prints the time to the serial monitor as text and control which language is printed.
It also sends the appropriate sequence of colour and intensities to a RGB(W) LED strip.
//--------------------------------------------
// CLOCK Say the time and load the LEDs
// with the proper colour and intensity
//--------------------------------------------
void Displaytime(void)
{
LedsOff();
 if( Mem.DisplayChoice == DIGITAL ) { TimePlaceDigit(timeinfo.tm_hour,timeinfo.tm_min); }
 else
   {
                     #ifdef NL144CLOCK
    Dutch();
                     #endif  //NL144CLOCK
...
                     #ifdef FOURLANGUAGECLOCK
    SetColours();                                                                            // Set the colours for the chosen palette
    Dutch();
    English();
    German();
    French();
                     #endif  //FOURLANGUAGECLOCK
   }
 ShowLeds();                                                                                  // And turn on the LEDs
}
DimLeds() reads the analog port and calculates an output intensity to a display or LED-strip.
The readings are squared to get a hyperbolic curve that resembles you eye correction for dark and light better than a linear range.
It works wonderfully well.
//--------------------------------------------
// LED Dim the LEDs measured by the LDR and print values
// LDR reading are between 0 and 255. The Brightness send to the LEDs is between 0 and 255
//--------------------------------------------
void DimLeds(bool print) { ... }
A list of subroutine follows used for several LED operations follows including the initialisations of the WS2812 or SK6812 LED-strip The SK6812 LED-strip also has a white LED whicht intensity is controlled with the highest bytes (WW) in the 32-bit integer (0XWWRRGGBB)
//--------------------------------------------                                                //
//  LED Start LEDs
//--------------------------------------------
void StartLeds(void)
{
 switch (Mem.LEDstrip)
    {
      case 0: LEDstrip = LED6812strip;
              white  = 0xFF000000;
              lgray  = 0x66000000;
              gray   = 0x33000000;
              dgray  = 0x22000000;
              wgray  = 0xAA000000;

      break;
      case 1: LEDstrip = LED2812strip;
              white  = 0xFFFFFF;
              lgray  = 0x666666; // R, G and B on together gives white light
...
}
A series of functions to get and store time.
The NTP time server puts the retrieved time in the standard C time structures.
/--------------------------- Time functions --------------------------

void GetTijd(byte printit)
void Print_RTC_tijd(void)
void PrintNTP_tijd(void)
void PrintUTCtijd(void)
void Print_tijd(void)
void SetRTCTime(void)
Convert a HEX string to a unsigned 32-bits integer
//--------------------------------------------
// CLOCK Convert Hex to uint32
//--------------------------------------------
uint32_t HexToDec(String hexString)
There is also a lot of slang in languages.
'Half nine' sometimes means 8:30 but can also be 9:30. (-:
These definitions are in clockfaces.h
//--------------------------------------------
//  CLOCK Dutch clock display
//--------------------------------------------
                      #if defined(NL) || defined(NL144CLOCK)
void Dutch(void)
{
HET;                                                                                          // HET  is always on
 if (timeinfo.tm_hour == 12 && timeinfo.tm_min == 0 && random(2)==0) { IS; NOEN; return; }
 if (timeinfo.tm_hour == 00 && timeinfo.tm_min == 0 && random(2)==0) { IS; MIDDER; NACHT; return; }
switch (timeinfo.tm_min)
 {
  case  0: IS;  PRECIES; break;
  case  1: IS;  break;
  case  2:
  case  3: WAS; break;
  case  4:
  case  5:
  case  6: IS;  MVIJF; OVER; break;
  case  7:
  case  8: WAS; MVIJF; OVER; break;
  case  9:
  case 10:
  case 11: IS;  MTIEN; OVER; break;
  case 12:
  case 13: WAS; MTIEN; OVER; break;
  case 14:
  case 15:
...
The Bluetooth Low Energy Nordic nRF.. functions.
They are different from the Texas instrument CC2540/CC2541 that is used in other
chipsets like the HM-10, HM16, JDY-08 et cetera.
More here on Instructables
/-----------------------------
// BLE SendMessage by BLE Slow in packets of 20 chars
//------------------------------
void SendMessageBLE(std::string Message)

/-----------------------------
// BLE Start BLE Classes
//------------------------------
class MyServerCallbacks: public BLEServerCallbacks

/-----------------------------
// BLE Start BLE Service
//------------------------------
void StartBLEService(void)

/-----------------------------
// BLE CheckBLE
//------------------------------
void CheckBLE(void)
Functions to start a WIFI connection and use the webpage
/--------------------------------------------
// WIFI WEBPAGE
//--------------------------------------------
void StartWIFI_NTP(void)

/--------------------------------------------
// WIFI WEBPAGE
//--------------------------------------------
void WebPage(void)

/--------------------------------------------
// WIFI WEBPAGE Not found message
//--------------------------------------------
void notFound(AsyncWebServerRequest *request)
Copy the text between the quotes and paste them after the character E
 Africa/Abidjan,"GMT0"
 Africa/Accra,"GMT0"
 Africa/Addis_Ababa,"EAT-3"
 Africa/Algiers,"CET-1"
 Africa/Asmara,"EAT-3"
 Africa/Bamako,"GMT0"
 Africa/Bangui,"WAT-1"
 Africa/Banjul,"GMT0"
 Africa/Bissau,"GMT0"
 Africa/Blantyre,"CAT-2"
 Africa/Brazzaville,"WAT-1"
 Africa/Bujumbura,"CAT-2"
 Africa/Cairo,"EET-2"
 Africa/Casablanca,"<+01>-1"
 Africa/Ceuta,"CET-1CEST,M3.5.0,M10.5.0/3"
 Africa/Conakry,"GMT0"
 Africa/Dakar,"GMT0"
 Africa/Dar_es_Salaam,"EAT-3"
 Africa/Djibouti,"EAT-3"
 Africa/Douala,"WAT-1"
 Africa/El_Aaiun,"<+01>-1"
 Africa/Freetown,"GMT0"
 Africa/Gaborone,"CAT-2"
 Africa/Harare,"CAT-2"
 Africa/Johannesburg,"SAST-2"
 Africa/Juba,"CAT-2"
 Africa/Kampala,"EAT-3"
 Africa/Khartoum,"CAT-2"
 Africa/Kigali,"CAT-2"
 Africa/Kinshasa,"WAT-1"
 Africa/Lagos,"WAT-1"
 Africa/Libreville,"WAT-1"
 Africa/Lome,"GMT0"
 Africa/Luanda,"WAT-1"
 Africa/Lubumbashi,"CAT-2"
 Africa/Lusaka,"CAT-2"
 Africa/Malabo,"WAT-1"
 Africa/Maputo,"CAT-2"
 Africa/Maseru,"SAST-2"
 Africa/Mbabane,"SAST-2"
 Africa/Mogadishu,"EAT-3"
 Africa/Monrovia,"GMT0"
 Africa/Nairobi,"EAT-3"
 Africa/Ndjamena,"WAT-1"
 Africa/Niamey,"WAT-1"
 Africa/Nouakchott,"GMT0"
 Africa/Ouagadougou,"GMT0"
 Africa/Porto-Novo,"WAT-1"
 Africa/Sao_Tome,"GMT0"
 Africa/Tripoli,"EET-2"
 Africa/Tunis,"CET-1"
 Africa/Windhoek,"CAT-2"
 America/Adak,"HST10HDT,M3.2.0,M11.1.0"
 America/Anchorage,"AKST9AKDT,M3.2.0,M11.1.0"
 America/Anguilla,"AST4"
 America/Antigua,"AST4"
 America/Araguaina,"<-03>3"
 America/Argentina/Buenos_Aires,"<-03>3"
 America/Argentina/Catamarca,"<-03>3"
 America/Argentina/Cordoba,"<-03>3"
 America/Argentina/Jujuy,"<-03>3"
 America/Argentina/La_Rioja,"<-03>3"
 America/Argentina/Mendoza,"<-03>3"
 America/Argentina/Rio_Gallegos,"<-03>3"
 America/Argentina/Salta,"<-03>3"
 America/Argentina/San_Juan,"<-03>3"
 America/Argentina/San_Luis,"<-03>3"
 America/Argentina/Tucuman,"<-03>3"
 America/Argentina/Ushuaia,"<-03>3"
 America/Aruba,"AST4"
 America/Asuncion,"<-04>4<-03>,M10.1.0/0,M3.4.0/0"
 America/Atikokan,"EST5"
 America/Bahia,"<-03>3"
 America/Bahia_Banderas,"CST6CDT,M4.1.0,M10.5.0"
 America/Barbados,"AST4"
 America/Belem,"<-03>3"
 America/Belize,"CST6"
 America/Blanc-Sablon,"AST4"
 America/Boa_Vista,"<-04>4"
 America/Bogota,"<-05>5"
 America/Boise,"MST7MDT,M3.2.0,M11.1.0"
 America/Cambridge_Bay,"MST7MDT,M3.2.0,M11.1.0"
 America/Campo_Grande,"<-04>4"
 America/Cancun,"EST5"
 America/Caracas,"<-04>4"
 America/Cayenne,"<-03>3"
 America/Cayman,"EST5"
 America/Chicago,"CST6CDT,M3.2.0,M11.1.0"
 America/Chihuahua,"MST7MDT,M4.1.0,M10.5.0"
 America/Costa_Rica,"CST6"
 America/Creston,"MST7"
 America/Cuiaba,"<-04>4"
 America/Curacao,"AST4"
 America/Danmarkshavn,"GMT0"
 America/Dawson,"MST7"
 America/Dawson_Creek,"MST7"
 America/Denver,"MST7MDT,M3.2.0,M11.1.0"
 America/Detroit,"EST5EDT,M3.2.0,M11.1.0"
 America/Dominica,"AST4"
 America/Edmonton,"MST7MDT,M3.2.0,M11.1.0"
 America/Eirunepe,"<-05>5"
 America/El_Salvador,"CST6"
 America/Fortaleza,"<-03>3"
 America/Fort_Nelson,"MST7"
 America/Glace_Bay,"AST4ADT,M3.2.0,M11.1.0"
 America/Godthab,"<-03>3<-02>,M3.5.0/-2,M10.5.0/-1"
 America/Goose_Bay,"AST4ADT,M3.2.0,M11.1.0"
 America/Grand_Turk,"EST5EDT,M3.2.0,M11.1.0"
 America/Grenada,"AST4"
 America/Guadeloupe,"AST4"
 America/Guatemala,"CST6"
 America/Guayaquil,"<-05>5"
 America/Guyana,"<-04>4"
 America/Halifax,"AST4ADT,M3.2.0,M11.1.0"
 America/Havana,"CST5CDT,M3.2.0/0,M11.1.0/1"
 America/Hermosillo,"MST7"
 America/Indiana/Indianapolis,"EST5EDT,M3.2.0,M11.1.0"
 America/Indiana/Knox,"CST6CDT,M3.2.0,M11.1.0"
 America/Indiana/Marengo,"EST5EDT,M3.2.0,M11.1.0"
 America/Indiana/Petersburg,"EST5EDT,M3.2.0,M11.1.0"
 America/Indiana/Tell_City,"CST6CDT,M3.2.0,M11.1.0"
 America/Indiana/Vevay,"EST5EDT,M3.2.0,M11.1.0"
 America/Indiana/Vincennes,"EST5EDT,M3.2.0,M11.1.0"
 America/Indiana/Winamac,"EST5EDT,M3.2.0,M11.1.0"
 America/Inuvik,"MST7MDT,M3.2.0,M11.1.0"
 America/Iqaluit,"EST5EDT,M3.2.0,M11.1.0"
 America/Jamaica,"EST5"
 America/Juneau,"AKST9AKDT,M3.2.0,M11.1.0"
 America/Kentucky/Louisville,"EST5EDT,M3.2.0,M11.1.0"
 America/Kentucky/Monticello,"EST5EDT,M3.2.0,M11.1.0"
 America/Kralendijk,"AST4"
 America/La_Paz,"<-04>4"
 America/Lima,"<-05>5"
 America/Los_Angeles,"PST8PDT,M3.2.0,M11.1.0"
 America/Lower_Princes,"AST4"
 America/Maceio,"<-03>3"
 America/Managua,"CST6"
 America/Manaus,"<-04>4"
 America/Marigot,"AST4"
 America/Martinique,"AST4"
 America/Matamoros,"CST6CDT,M3.2.0,M11.1.0"
 America/Mazatlan,"MST7MDT,M4.1.0,M10.5.0"
 America/Menominee,"CST6CDT,M3.2.0,M11.1.0"
 America/Merida,"CST6CDT,M4.1.0,M10.5.0"
 America/Metlakatla,"AKST9AKDT,M3.2.0,M11.1.0"
 America/Mexico_City,"CST6CDT,M4.1.0,M10.5.0"
 America/Miquelon,"<-03>3<-02>,M3.2.0,M11.1.0"
 America/Moncton,"AST4ADT,M3.2.0,M11.1.0"
 America/Monterrey,"CST6CDT,M4.1.0,M10.5.0"
 America/Montevideo,"<-03>3"
 America/Montreal,"EST5EDT,M3.2.0,M11.1.0"
 America/Montserrat,"AST4"
 America/Nassau,"EST5EDT,M3.2.0,M11.1.0"
 America/New_York,"EST5EDT,M3.2.0,M11.1.0"
 America/Nipigon,"EST5EDT,M3.2.0,M11.1.0"
 America/Nome,"AKST9AKDT,M3.2.0,M11.1.0"
 America/Noronha,"<-02>2"
 America/North_Dakota/Beulah,"CST6CDT,M3.2.0,M11.1.0"
 America/North_Dakota/Center,"CST6CDT,M3.2.0,M11.1.0"
 America/North_Dakota/New_Salem,"CST6CDT,M3.2.0,M11.1.0"
 America/Nuuk,"<-03>3<-02>,M3.5.0/-2,M10.5.0/-1"
 America/Ojinaga,"MST7MDT,M3.2.0,M11.1.0"
 America/Panama,"EST5"
 America/Pangnirtung,"EST5EDT,M3.2.0,M11.1.0"
 America/Paramaribo,"<-03>3"
 America/Phoenix,"MST7"
 America/Port-au-Prince,"EST5EDT,M3.2.0,M11.1.0"
 America/Port_of_Spain,"AST4"
 America/Porto_Velho,"<-04>4"
 America/Puerto_Rico,"AST4"
 America/Punta_Arenas,"<-03>3"
 America/Rainy_River,"CST6CDT,M3.2.0,M11.1.0"
 America/Rankin_Inlet,"CST6CDT,M3.2.0,M11.1.0"
 America/Recife,"<-03>3"
 America/Regina,"CST6"
 America/Resolute,"CST6CDT,M3.2.0,M11.1.0"
 America/Rio_Branco,"<-05>5"
 America/Santarem,"<-03>3"
 America/Santiago,"<-04>4<-03>,M9.1.6/24,M4.1.6/24"
 America/Santo_Domingo,"AST4"
 America/Sao_Paulo,"<-03>3"
 America/Scoresbysund,"<-01>1<+00>,M3.5.0/0,M10.5.0/1"
 America/Sitka,"AKST9AKDT,M3.2.0,M11.1.0"
 America/St_Barthelemy,"AST4"
 America/St_Johns,"NST3:30NDT,M3.2.0,M11.1.0"
 America/St_Kitts,"AST4"
 America/St_Lucia,"AST4"
 America/St_Thomas,"AST4"
 America/St_Vincent,"AST4"
 America/Swift_Current,"CST6"
 America/Tegucigalpa,"CST6"
 America/Thule,"AST4ADT,M3.2.0,M11.1.0"
 America/Thunder_Bay,"EST5EDT,M3.2.0,M11.1.0"
 America/Tijuana,"PST8PDT,M3.2.0,M11.1.0"
 America/Toronto,"EST5EDT,M3.2.0,M11.1.0"
 America/Tortola,"AST4"
 America/Vancouver,"PST8PDT,M3.2.0,M11.1.0"
 America/Whitehorse,"MST7"
 America/Winnipeg,"CST6CDT,M3.2.0,M11.1.0"
 America/Yakutat,"AKST9AKDT,M3.2.0,M11.1.0"
 America/Yellowknife,"MST7MDT,M3.2.0,M11.1.0"
 Antarctica/Casey,"<+11>-11"
 Antarctica/Davis,"<+07>-7"
 Antarctica/DumontDUrville,"<+10>-10"
 Antarctica/Macquarie,"AEST-10AEDT,M10.1.0,M4.1.0/3"
 Antarctica/Mawson,"<+05>-5"
 Antarctica/McMurdo,"NZST-12NZDT,M9.5.0,M4.1.0/3"
 Antarctica/Palmer,"<-03>3"
 Antarctica/Rothera,"<-03>3"
 Antarctica/Syowa,"<+03>-3"
 Antarctica/Troll,"<+00>0<+02>-2,M3.5.0/1,M10.5.0/3"
 Antarctica/Vostok,"<+06>-6"
 Arctic/Longyearbyen,"CET-1CEST,M3.5.0,M10.5.0/3"
 Asia/Aden,"<+03>-3"
 Asia/Almaty,"<+06>-6"
 Asia/Amman,"EET-2EEST,M2.5.4/24,M10.5.5/1"
 Asia/Anadyr,"<+12>-12"
 Asia/Aqtau,"<+05>-5"
 Asia/Aqtobe,"<+05>-5"
 Asia/Ashgabat,"<+05>-5"
 Asia/Atyrau,"<+05>-5"
 Asia/Baghdad,"<+03>-3"
 Asia/Bahrain,"<+03>-3"
 Asia/Baku,"<+04>-4"
 Asia/Bangkok,"<+07>-7"
 Asia/Barnaul,"<+07>-7"
 Asia/Beirut,"EET-2EEST,M3.5.0/0,M10.5.0/0"
 Asia/Bishkek,"<+06>-6"
 Asia/Brunei,"<+08>-8"
 Asia/Chita,"<+09>-9"
 Asia/Choibalsan,"<+08>-8"
 Asia/Colombo,"<+0530>-5:30"
 Asia/Damascus,"EET-2EEST,M3.5.5/0,M10.5.5/0"
 Asia/Dhaka,"<+06>-6"
 Asia/Dili,"<+09>-9"
 Asia/Dubai,"<+04>-4"
 Asia/Dushanbe,"<+05>-5"
 Asia/Famagusta,"EET-2EEST,M3.5.0/3,M10.5.0/4"
 Asia/Gaza,"EET-2EEST,M3.4.4/48,M10.5.5/1"
 Asia/Hebron,"EET-2EEST,M3.4.4/48,M10.5.5/1"
 Asia/Ho_Chi_Minh,"<+07>-7"
 Asia/Hong_Kong,"HKT-8"
 Asia/Hovd,"<+07>-7"
 Asia/Irkutsk,"<+08>-8"
 Asia/Jakarta,"WIB-7"
 Asia/Jayapura,"WIT-9"
 Asia/Jerusalem,"IST-2IDT,M3.4.4/26,M10.5.0"
 Asia/Kabul,"<+0430>-4:30"
 Asia/Kamchatka,"<+12>-12"
 Asia/Karachi,"PKT-5"
 Asia/Kathmandu,"<+0545>-5:45"
 Asia/Khandyga,"<+09>-9"
 Asia/Kolkata,"IST-5:30"
 Asia/Krasnoyarsk,"<+07>-7"
 Asia/Kuala_Lumpur,"<+08>-8"
 Asia/Kuching,"<+08>-8"
 Asia/Kuwait,"<+03>-3"
 Asia/Macau,"CST-8"
 Asia/Magadan,"<+11>-11"
 Asia/Makassar,"WITA-8"
 Asia/Manila,"PST-8"
 Asia/Muscat,"<+04>-4"
 Asia/Nicosia,"EET-2EEST,M3.5.0/3,M10.5.0/4"
 Asia/Novokuznetsk,"<+07>-7"
 Asia/Novosibirsk,"<+07>-7"
 Asia/Omsk,"<+06>-6"
 Asia/Oral,"<+05>-5"
 Asia/Phnom_Penh,"<+07>-7"
 Asia/Pontianak,"WIB-7"
 Asia/Pyongyang,"KST-9"
 Asia/Qatar,"<+03>-3"
 Asia/Qyzylorda,"<+05>-5"
 Asia/Riyadh,"<+03>-3"
 Asia/Sakhalin,"<+11>-11"
 Asia/Samarkand,"<+05>-5"
 Asia/Seoul,"KST-9"
 Asia/Shanghai,"CST-8"
 Asia/Singapore,"<+08>-8"
 Asia/Srednekolymsk,"<+11>-11"
 Asia/Taipei,"CST-8"
 Asia/Tashkent,"<+05>-5"
 Asia/Tbilisi,"<+04>-4"
 Asia/Tehran,"<+0330>-3:30<+0430>,J79/24,J263/24"
 Asia/Thimphu,"<+06>-6"
 Asia/Tokyo,"JST-9"
 Asia/Tomsk,"<+07>-7"
 Asia/Ulaanbaatar,"<+08>-8"
 Asia/Urumqi,"<+06>-6"
 Asia/Ust-Nera,"<+10>-10"
 Asia/Vientiane,"<+07>-7"
 Asia/Vladivostok,"<+10>-10"
 Asia/Yakutsk,"<+09>-9"
 Asia/Yangon,"<+0630>-6:30"
 Asia/Yekaterinburg,"<+05>-5"
 Asia/Yerevan,"<+04>-4"
 Atlantic/Azores,"<-01>1<+00>,M3.5.0/0,M10.5.0/1"
 Atlantic/Bermuda,"AST4ADT,M3.2.0,M11.1.0"
 Atlantic/Canary,"WET0WEST,M3.5.0/1,M10.5.0"
 Atlantic/Cape_Verde,"<-01>1"
 Atlantic/Faroe,"WET0WEST,M3.5.0/1,M10.5.0"
 Atlantic/Madeira,"WET0WEST,M3.5.0/1,M10.5.0"
 Atlantic/Reykjavik,"GMT0"
 Atlantic/South_Georgia,"<-02>2"
 Atlantic/Stanley,"<-03>3"
 Atlantic/St_Helena,"GMT0"
 Australia/Adelaide,"ACST-9:30ACDT,M10.1.0,M4.1.0/3"
 Australia/Brisbane,"AEST-10"
 Australia/Broken_Hill,"ACST-9:30ACDT,M10.1.0,M4.1.0/3"
 Australia/Currie,"AEST-10AEDT,M10.1.0,M4.1.0/3"
 Australia/Darwin,"ACST-9:30"
 Australia/Eucla,"<+0845>-8:45"
 Australia/Hobart,"AEST-10AEDT,M10.1.0,M4.1.0/3"
 Australia/Lindeman,"AEST-10"
 Australia/Lord_Howe,"<+1030>-10:30<+11>-11,M10.1.0,M4.1.0"
 Australia/Melbourne,"AEST-10AEDT,M10.1.0,M4.1.0/3"
 Australia/Perth,"AWST-8"
 Australia/Sydney,"AEST-10AEDT,M10.1.0,M4.1.0/3"
 Europe/Amsterdam,"CET-1CEST,M3.5.0,M10.5.0/3"
 Europe/Andorra,"CET-1CEST,M3.5.0,M10.5.0/3"
 Europe/Astrakhan,"<+04>-4"
 Europe/Athens,"EET-2EEST,M3.5.0/3,M10.5.0/4"
 Europe/Belgrade,"CET-1CEST,M3.5.0,M10.5.0/3"
 Europe/Berlin,"CET-1CEST,M3.5.0,M10.5.0/3"
 Europe/Bratislava,"CET-1CEST,M3.5.0,M10.5.0/3"
 Europe/Brussels,"CET-1CEST,M3.5.0,M10.5.0/3"
 Europe/Bucharest,"EET-2EEST,M3.5.0/3,M10.5.0/4"
 Europe/Budapest,"CET-1CEST,M3.5.0,M10.5.0/3"
 Europe/Busingen,"CET-1CEST,M3.5.0,M10.5.0/3"
 Europe/Chisinau,"EET-2EEST,M3.5.0,M10.5.0/3"
 Europe/Copenhagen,"CET-1CEST,M3.5.0,M10.5.0/3"
 Europe/Dublin,"IST-1GMT0,M10.5.0,M3.5.0/1"
 Europe/Gibraltar,"CET-1CEST,M3.5.0,M10.5.0/3"
 Europe/Guernsey,"GMT0BST,M3.5.0/1,M10.5.0"
 Europe/Helsinki,"EET-2EEST,M3.5.0/3,M10.5.0/4"
 Europe/Isle_of_Man,"GMT0BST,M3.5.0/1,M10.5.0"
 Europe/Istanbul,"<+03>-3"
 Europe/Jersey,"GMT0BST,M3.5.0/1,M10.5.0"
 Europe/Kaliningrad,"EET-2"
 Europe/Kiev,"EET-2EEST,M3.5.0/3,M10.5.0/4"
 Europe/Kirov,"<+03>-3"
 Europe/Lisbon,"WET0WEST,M3.5.0/1,M10.5.0"
 Europe/Ljubljana,"CET-1CEST,M3.5.0,M10.5.0/3"
 Europe/London,"GMT0BST,M3.5.0/1,M10.5.0"
 Europe/Luxembourg,"CET-1CEST,M3.5.0,M10.5.0/3"
 Europe/Madrid,"CET-1CEST,M3.5.0,M10.5.0/3"
 Europe/Malta,"CET-1CEST,M3.5.0,M10.5.0/3"
 Europe/Mariehamn,"EET-2EEST,M3.5.0/3,M10.5.0/4"
 Europe/Minsk,"<+03>-3"
 Europe/Monaco,"CET-1CEST,M3.5.0,M10.5.0/3"
 Europe/Moscow,"MSK-3"
 Europe/Oslo,"CET-1CEST,M3.5.0,M10.5.0/3"
 Europe/Paris,"CET-1CEST,M3.5.0,M10.5.0/3"
 Europe/Podgorica,"CET-1CEST,M3.5.0,M10.5.0/3"
 Europe/Prague,"CET-1CEST,M3.5.0,M10.5.0/3"
 Europe/Riga,"EET-2EEST,M3.5.0/3,M10.5.0/4"
 Europe/Rome,"CET-1CEST,M3.5.0,M10.5.0/3"
 Europe/Samara,"<+04>-4"
 Europe/San_Marino,"CET-1CEST,M3.5.0,M10.5.0/3"
 Europe/Sarajevo,"CET-1CEST,M3.5.0,M10.5.0/3"
 Europe/Saratov,"<+04>-4"
 Europe/Simferopol,"MSK-3"
 Europe/Skopje,"CET-1CEST,M3.5.0,M10.5.0/3"
 Europe/Sofia,"EET-2EEST,M3.5.0/3,M10.5.0/4"
 Europe/Stockholm,"CET-1CEST,M3.5.0,M10.5.0/3"
 Europe/Tallinn,"EET-2EEST,M3.5.0/3,M10.5.0/4"
 Europe/Tirane,"CET-1CEST,M3.5.0,M10.5.0/3"
 Europe/Ulyanovsk,"<+04>-4"
 Europe/Uzhgorod,"EET-2EEST,M3.5.0/3,M10.5.0/4"
 Europe/Vaduz,"CET-1CEST,M3.5.0,M10.5.0/3"
 Europe/Vatican,"CET-1CEST,M3.5.0,M10.5.0/3"
 Europe/Vienna,"CET-1CEST,M3.5.0,M10.5.0/3"
 Europe/Vilnius,"EET-2EEST,M3.5.0/3,M10.5.0/4"
 Europe/Volgograd,"<+03>-3"
 Europe/Warsaw,"CET-1CEST,M3.5.0,M10.5.0/3"
 Europe/Zagreb,"CET-1CEST,M3.5.0,M10.5.0/3"
 Europe/Zaporozhye,"EET-2EEST,M3.5.0/3,M10.5.0/4"
 Europe/Zurich,"CET-1CEST,M3.5.0,M10.5.0/3"
 Indian/Antananarivo,"EAT-3"
 Indian/Chagos,"<+06>-6"
 Indian/Christmas,"<+07>-7"
 Indian/Cocos,"<+0630>-6:30"
 Indian/Comoro,"EAT-3"
 Indian/Kerguelen,"<+05>-5"
 Indian/Mahe,"<+04>-4"
 Indian/Maldives,"<+05>-5"
 Indian/Mauritius,"<+04>-4"
 Indian/Mayotte,"EAT-3"
 Indian/Reunion,"<+04>-4"
 Pacific/Apia,"<+13>-13"
 Pacific/Auckland,"NZST-12NZDT,M9.5.0,M4.1.0/3"
 Pacific/Bougainville,"<+11>-11"
 Pacific/Chatham,"<+1245>-12:45<+1345>,M9.5.0/2:45,M4.1.0/3:45"
 Pacific/Chuuk,"<+10>-10"
 Pacific/Easter,"<-06>6<-05>,M9.1.6/22,M4.1.6/22"
 Pacific/Efate,"<+11>-11"
 Pacific/Enderbury,"<+13>-13"
 Pacific/Fakaofo,"<+13>-13"
 Pacific/Fiji,"<+12>-12<+13>,M11.2.0,M1.2.3/99"
 Pacific/Funafuti,"<+12>-12"
 Pacific/Galapagos,"<-06>6"
 Pacific/Gambier,"<-09>9"
 Pacific/Guadalcanal,"<+11>-11"
 Pacific/Guam,"ChST-10"
 Pacific/Honolulu,"HST10"
 Pacific/Kiritimati,"<+14>-14"
 Pacific/Kosrae,"<+11>-11"
 Pacific/Kwajalein,"<+12>-12"
 Pacific/Majuro,"<+12>-12"
 Pacific/Marquesas,"<-0930>9:30"
 Pacific/Midway,"SST11"
 Pacific/Nauru,"<+12>-12"
 Pacific/Niue,"<-11>11"
 Pacific/Norfolk,"<+11>-11<+12>,M10.1.0,M4.1.0/3"
 Pacific/Noumea,"<+11>-11"
 Pacific/Pago_Pago,"SST11"
 Pacific/Palau,"<+09>-9"
 Pacific/Pitcairn,"<-08>8"
 Pacific/Pohnpei,"<+11>-11"
 Pacific/Port_Moresby,"<+10>-10"
 Pacific/Rarotonga,"<-10>10"
 Pacific/Saipan,"ChST-10"
 Pacific/Tahiti,"<-10>10"
 Pacific/Tarawa,"<+12>-12"
 Pacific/Tongatapu,"<+13>-13"
 Pacific/Wake,"<+12>-12"
 Pacific/Wallis,"<+12>-12"
 Etc/GMT,"GMT0"
 Etc/GMT-0,"GMT0"
 Etc/GMT-1,"<+01>-1"
 Etc/GMT-2,"<+02>-2"
 Etc/GMT-3,"<+03>-3"
 Etc/GMT-4,"<+04>-4"
 Etc/GMT-5,"<+05>-5"
 Etc/GMT-6,"<+06>-6"
 Etc/GMT-7,"<+07>-7"
 Etc/GMT-8,"<+08>-8"
 Etc/GMT-9,"<+09>-9"
 Etc/GMT-10,"<+10>-10"
 Etc/GMT-11,"<+11>-11"
 Etc/GMT-12,"<+12>-12"
 Etc/GMT-13,"<+13>-13"
 Etc/GMT-14,"<+14>-14"
 Etc/GMT0,"GMT0"
 Etc/GMT+0,"GMT0"
 Etc/GMT+1,"<-01>1"
 Etc/GMT+2,"<-02>2"
 Etc/GMT+3,"<-03>3"
 Etc/GMT+4,"<-04>4"
 Etc/GMT+5,"<-05>5"
 Etc/GMT+6,"<-06>6"
 Etc/GMT+7,"<-07>7"
 Etc/GMT+8,"<-08>8"
 Etc/GMT+9,"<-09>9"
 Etc/GMT+10,"<-10>10"
 Etc/GMT+11,"<-11>11"
 Etc/GMT+12,"<-12>12"
 Etc/UCT,"UTC0"
 Etc/UTC,"UTC0"
 Etc/Greenwich,"GMT0"
 Etc/Universal,"UTC0"
 Etc/Zulu,"UTC0"