
1Finding and connecting to a device
BLE Serial is a serial (UART) terminal for Bluetooth Low Energy modules — CC2541 boards such as the HM-10, AT-09, MLT-BT05 and JDY-08, and anything using the Nordic UART Service, including nRF52 modules and Arduino, Raspberry Pi Pico and ESP32 projects that implement it.
The app has four tabs along the bottom: Scan, Console, Functions and Settings.
The first time
Press Scan. Android asks for permission to find Nearby devices (on Android 8 to 11 it asks for Location instead — Android requires this for any Bluetooth scan, and the app does not use your position). If Bluetooth is switched off the app asks to turn it on. Without the permission the app cannot see any device.
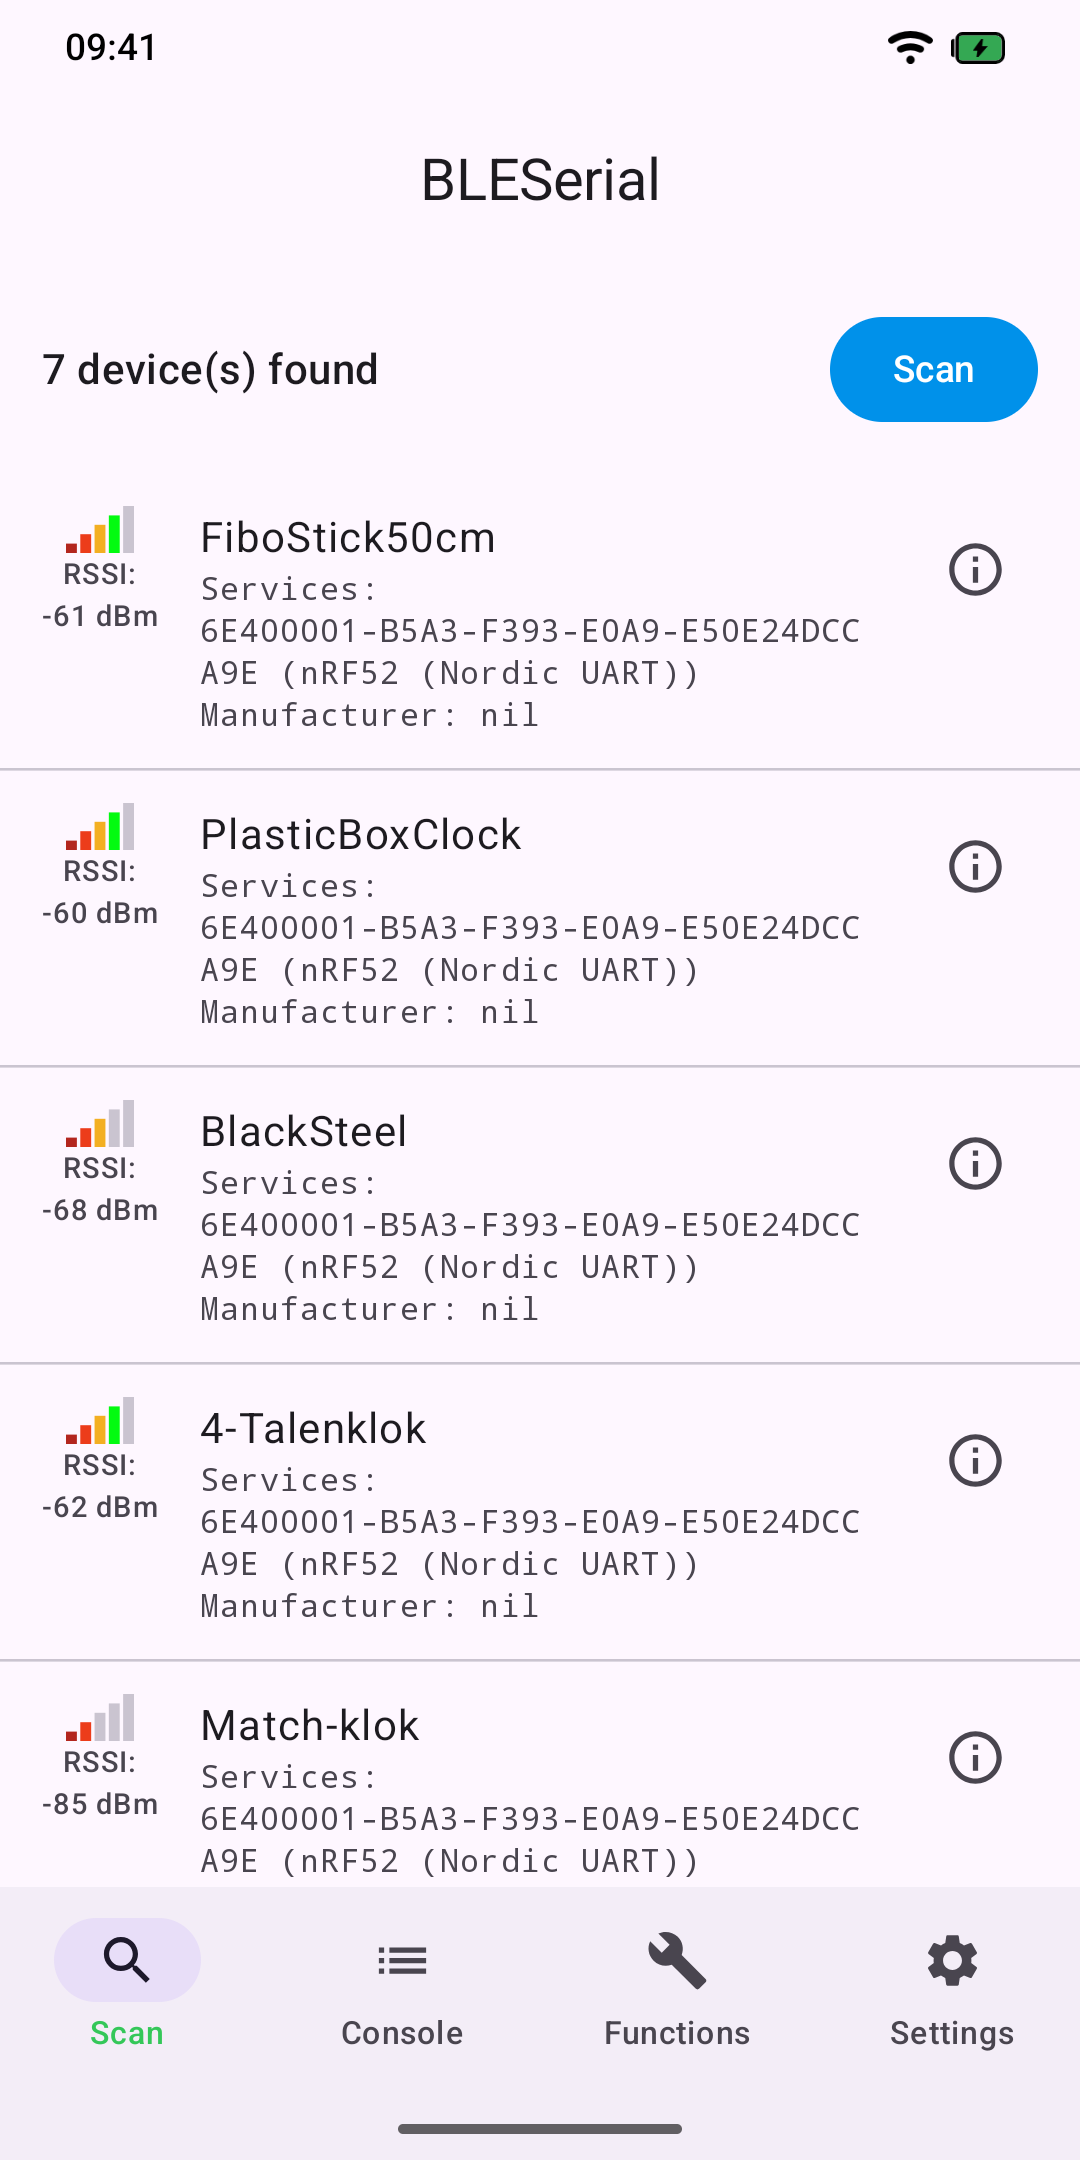
The list
One scan finds both chip families. Each row shows coloured signal bars with the RSSI in dBm, the device name, the services it advertises, its manufacturer data, and — for a device it recognises — which chip profile it will use. A device that is advertising but will not accept a connection is marked Not connectable. The scan stops by itself after 15 seconds; press Stop to end it sooner.
Tap a row to connect. The app moves to the Console and the device name appears at the top. The connected device is marked Connected in the list.
Device analysis
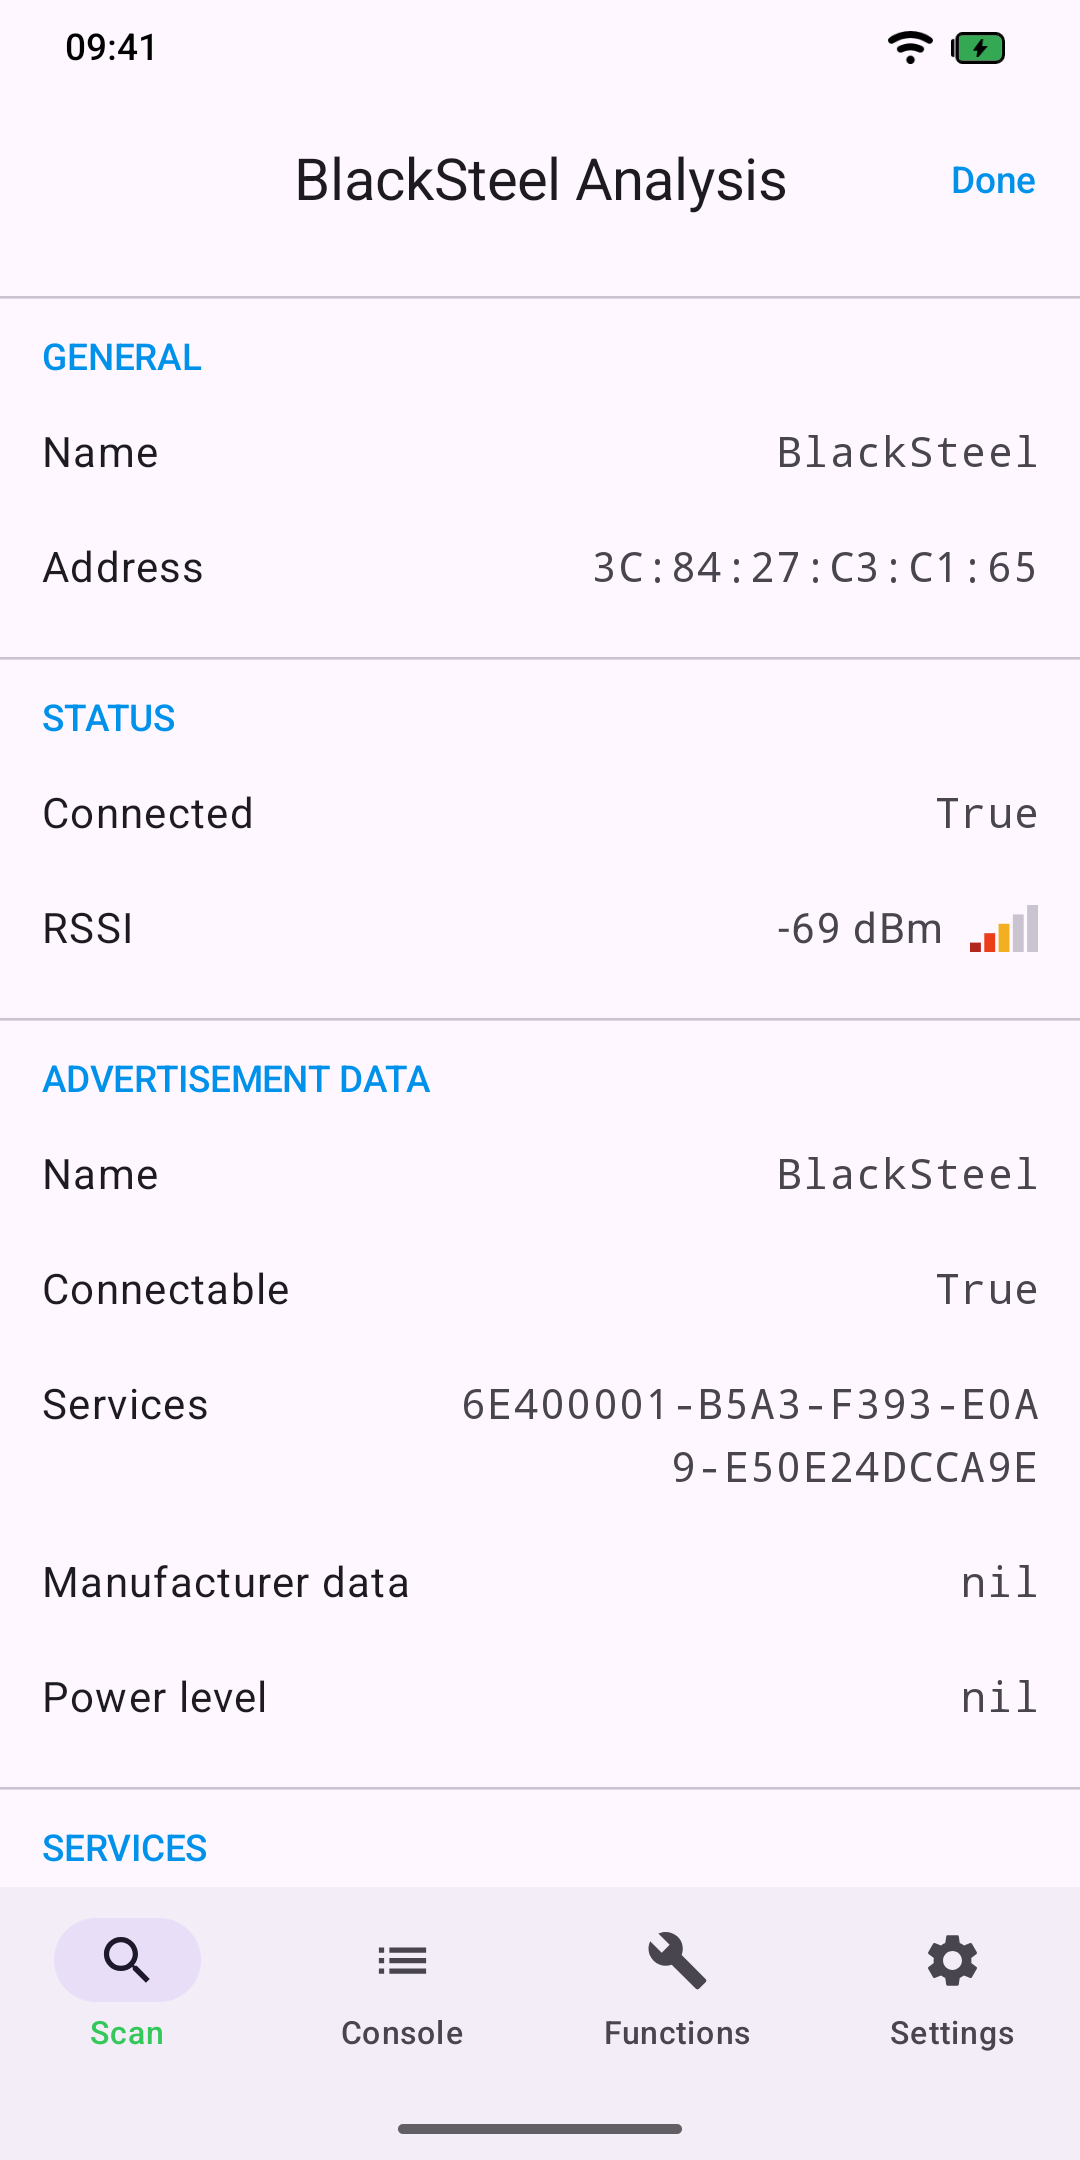
Tap the ⓘ on a row instead of the row itself to see everything the device offers: general details, a live signal strength, the advertisement data, and every service with its characteristics, their properties and descriptors. Pick a format to see a characteristic's value, and Read again to refresh it. This is the place to look when a module will not work and you need to find out which UUIDs it actually uses. Analysis is read-only. Done returns to the list.
Reconnecting
Turn on Reconnect to last device under Settings → Scan and the app remembers the device you last connected to. Whenever a scan finds it, the app connects by itself, and it scans once when it starts (only if you have already given permission and Bluetooth is on — it never asks anything at start-up). If a connection is lost — the module is switched off, or goes out of range — the app tries again for about four minutes. Pressing Disconnect yourself, or choosing another device, never triggers it.
2The console
Everything received appears here. Type in the field at the bottom and press the send key (or the send arrow) to send. The keyboard closes after each message.
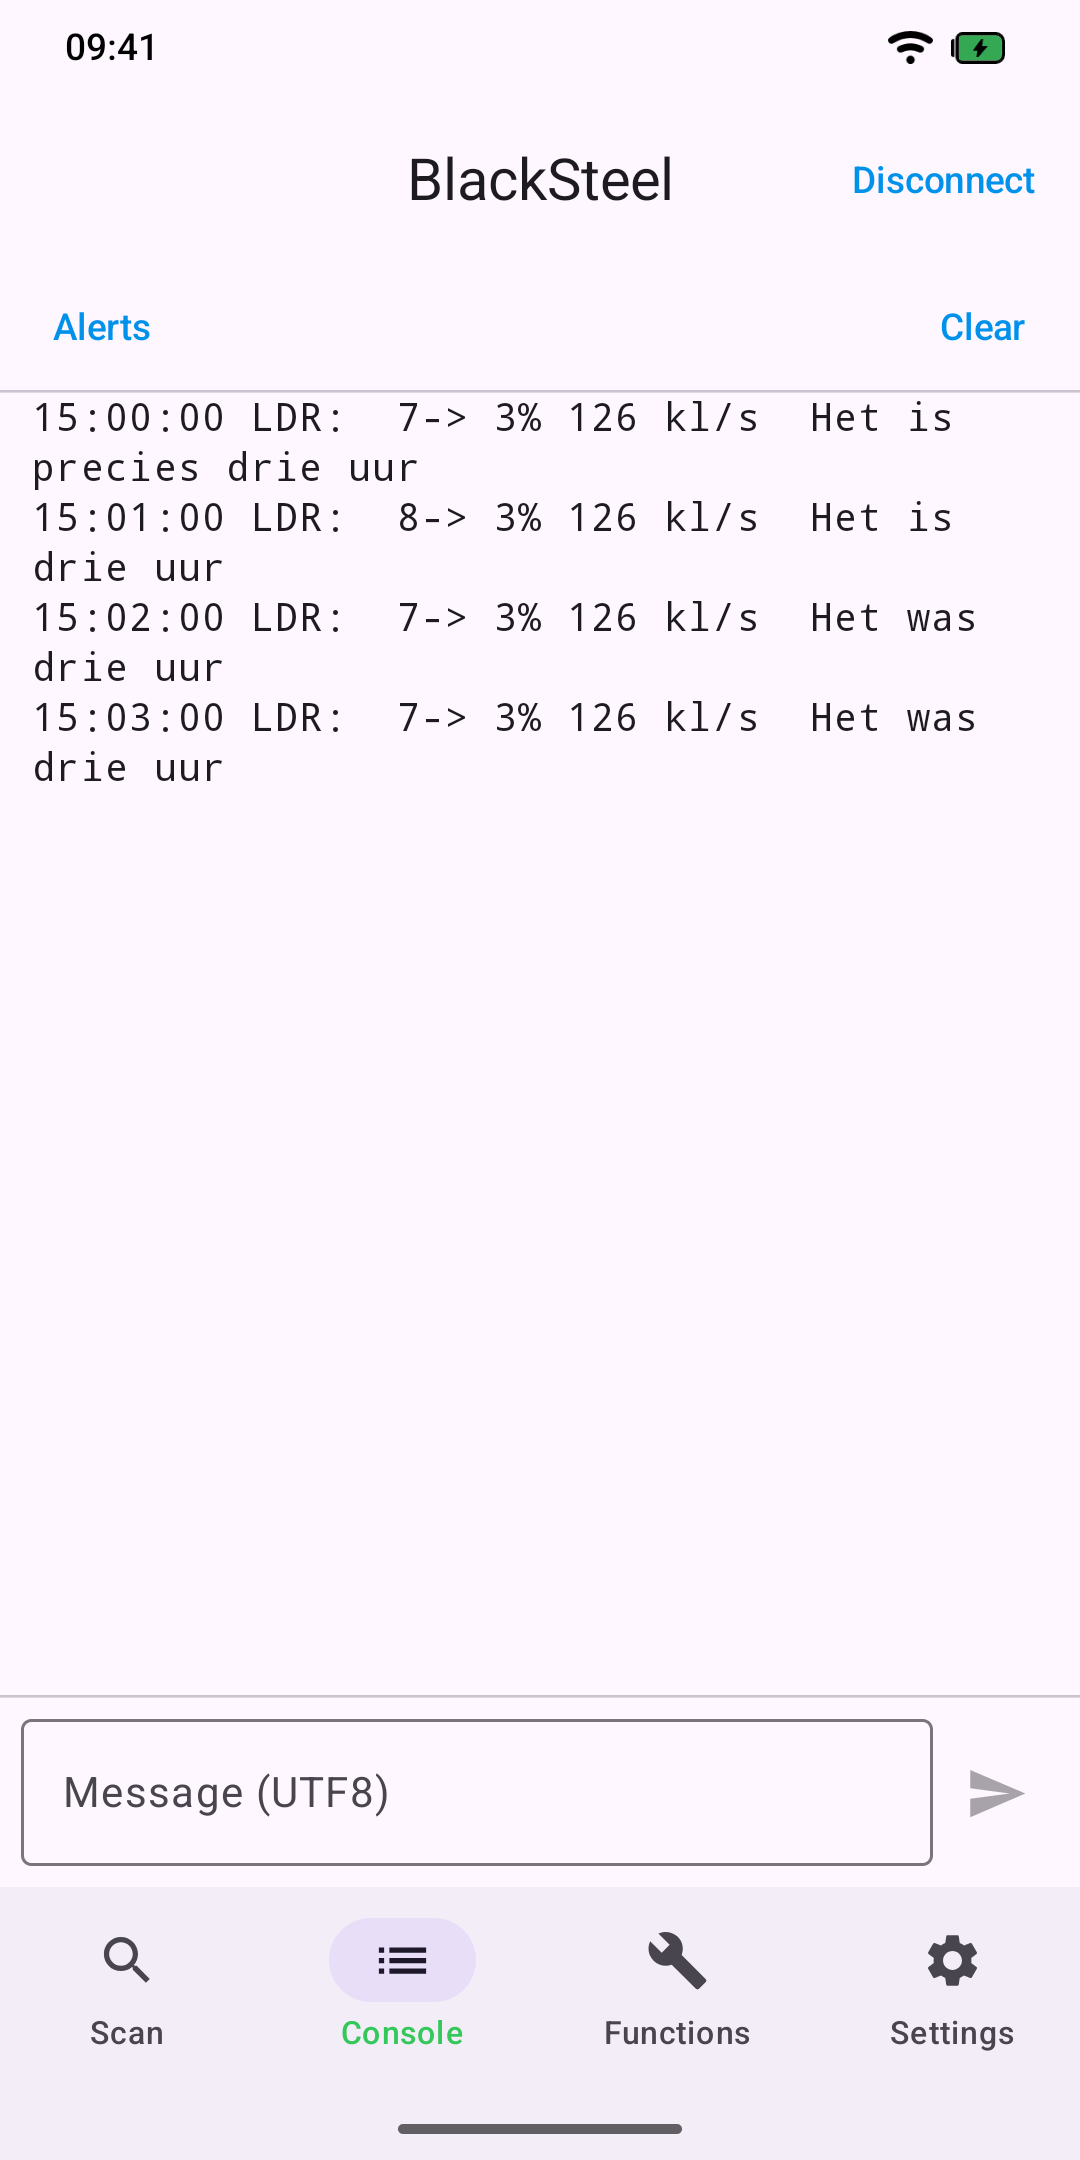
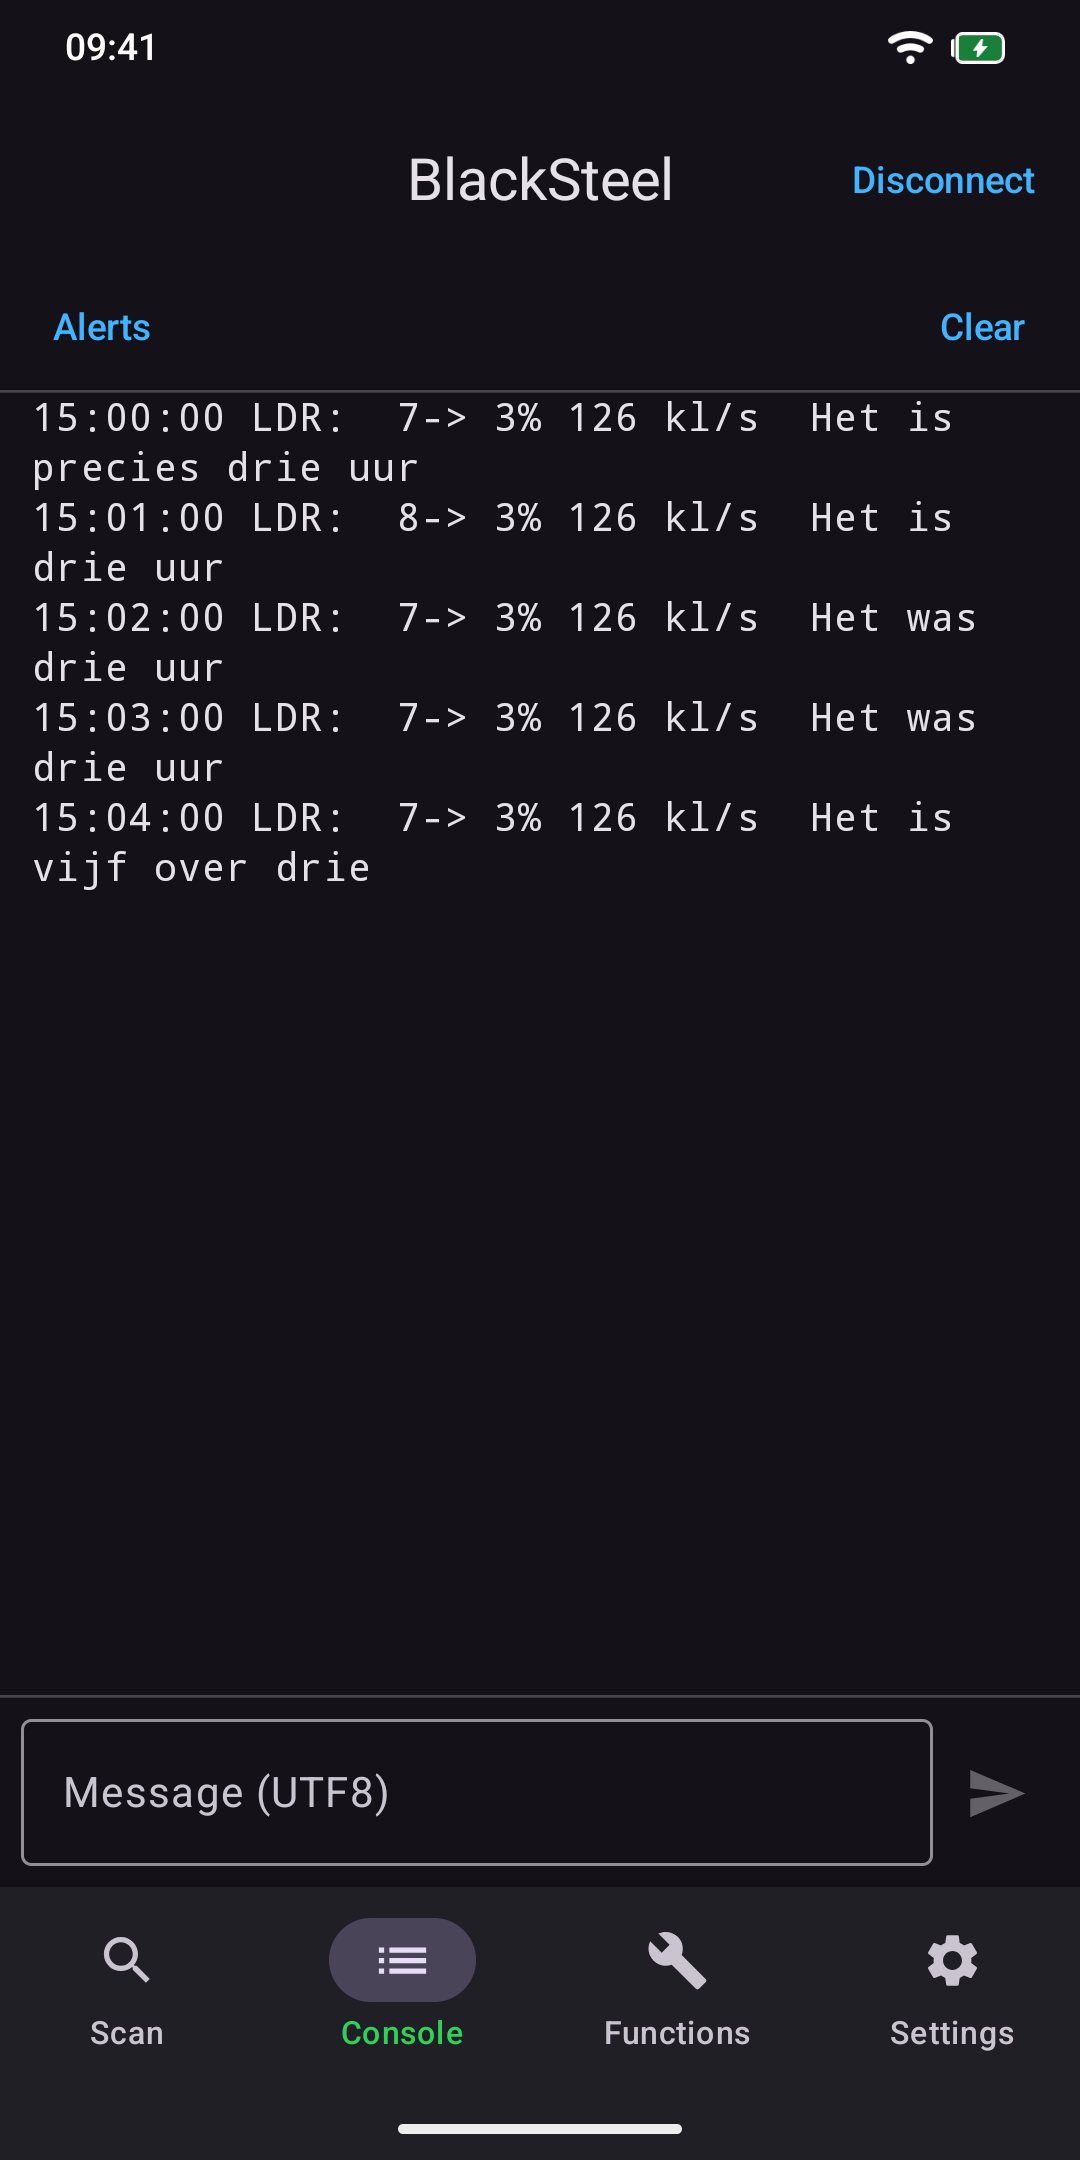
| Control | What it does |
|---|---|
| Disconnect | Top right. Ends the connection, clears the console and returns to the Scan tab |
| Alerts | Opens the list of alerts (section 5) |
| Clear | Empty the screen |
| Message field | Shows the input format in brackets, for example Message (UTF8). Greyed out and marked Not connected until you connect |
Long lines wrap, and special characters such as é, ° and € — and emoji — arrive whole even when a Bluetooth packet happens to cut one in the middle.
3Display and input
Both groups are in the Settings tab (section 6) and take effect at once.
Display
| Setting | Notes |
|---|---|
| Format | Show incoming bytes as UTF8, Hexadecimal, Decimal, Octal or Binary |
| New line after | When to start a new line: after each Message, after a number of bytes (Byte count), after a given byte value (Byte) or after a Line feed |
| Show sent messages | Echo what you send into the console, in a different colour |
| Line numbers | A running number in front of each line |
| Time stamps | The time of day in front of each line |
| Milliseconds in time stamps | Add milliseconds to the time |
| Clear on new message | Show only the latest message — useful for a device that reports one reading at a time |
| Auto scroll | Follow the newest line |
| Play sounds | A short tone when you send and when something is received |
| Font size | 8 to 40 |
New line after is the setting worth understanding. Bluetooth delivers data in packets that need not line up with the lines your device is sending. If the output looks broken up, choose Line feed and each line is reassembled properly.
Input
| Setting | Notes |
|---|---|
| Format | How to read what you type: UTF8, Hexadecimal, Decimal, Octal or Binary |
| Append to input | Add \n, \r or \r\n to everything you type, or None |
| Max. chunk size (bytes) | Long messages are split into pieces of this size with a short pause between them, so a slow module can keep up. 80 by default |
If your device expects every command to end in a newline, set Append to input once and you need never think about it again.
4Functions
The Functions tab is a grid of buttons that send messages you have set up in advance, so you never type the same command twice.
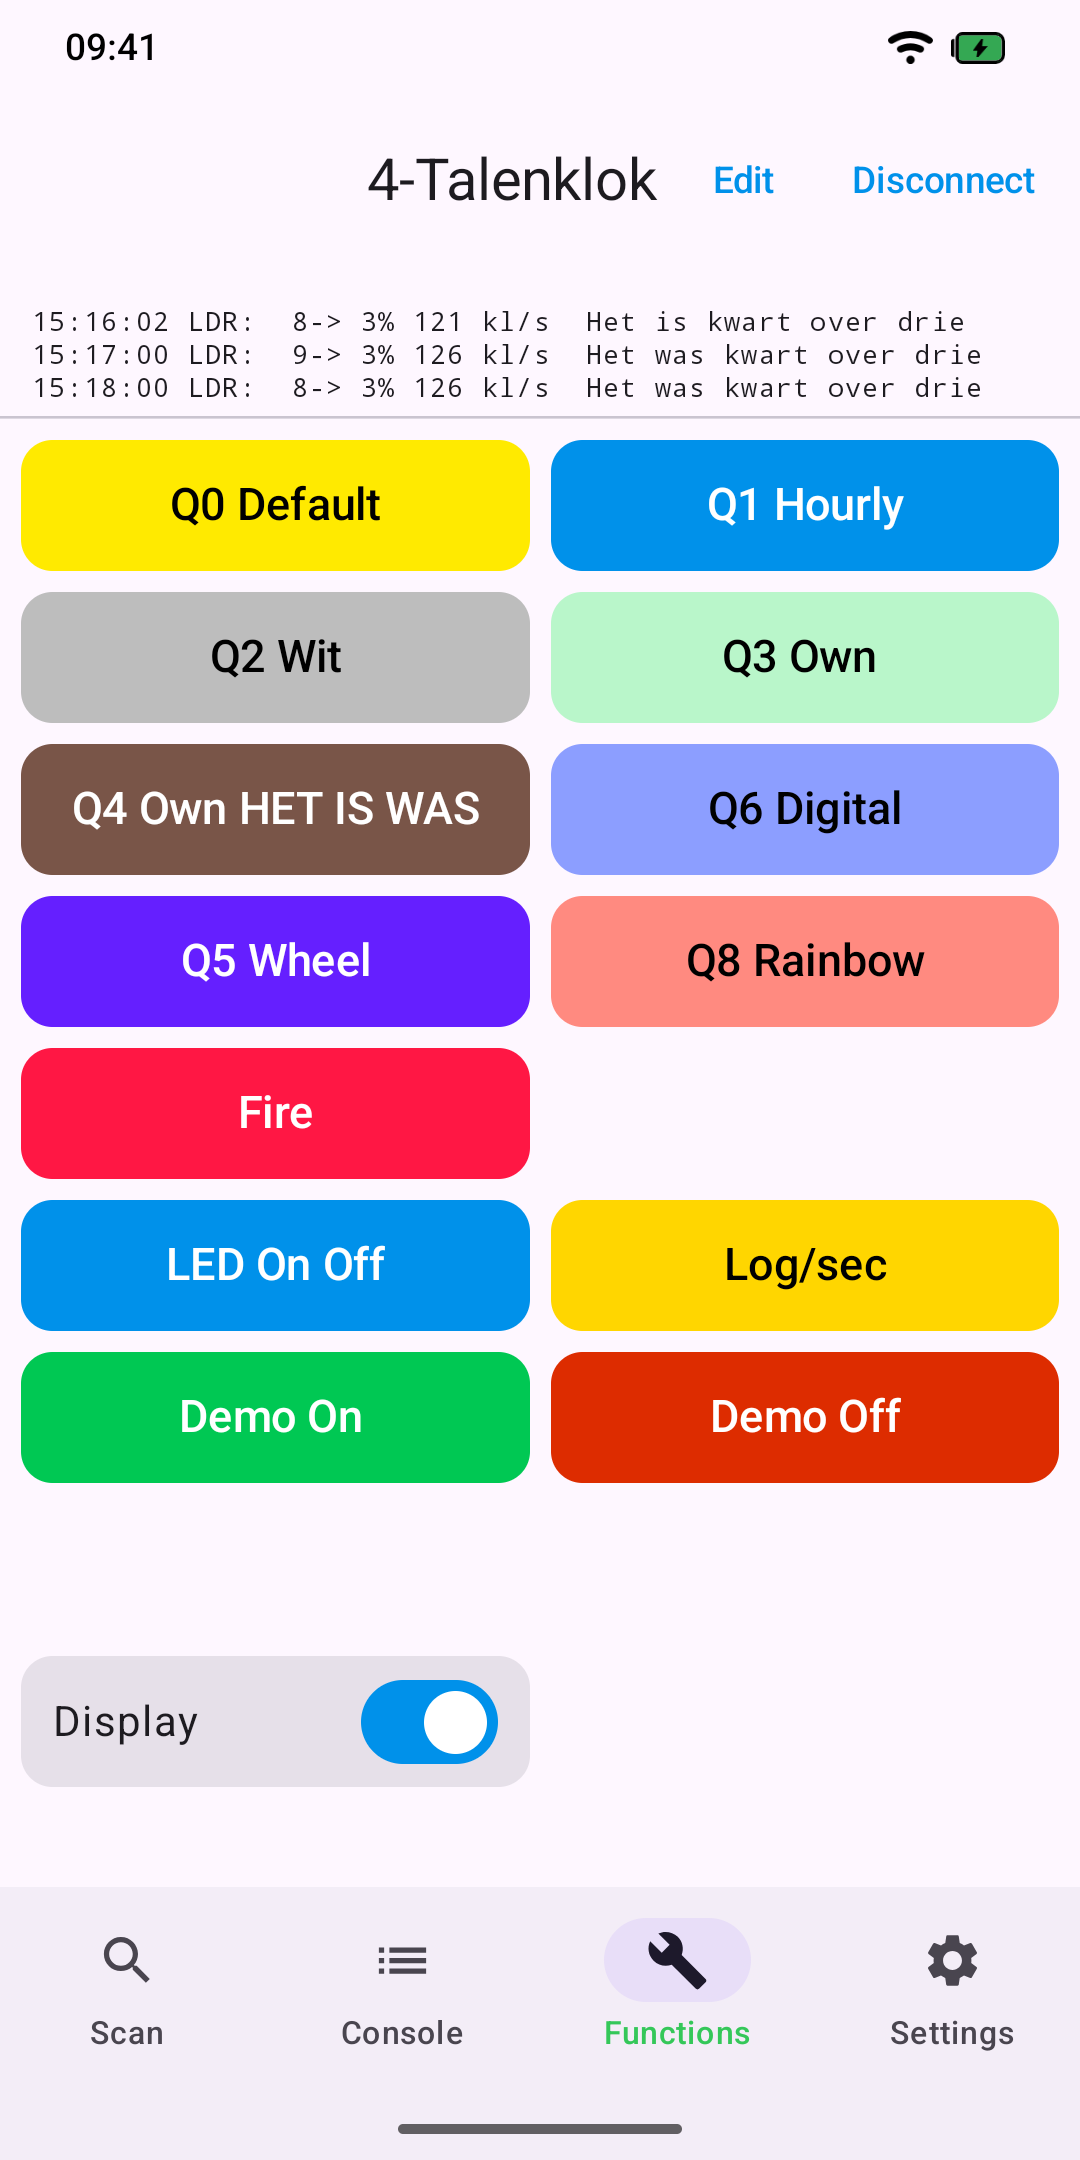
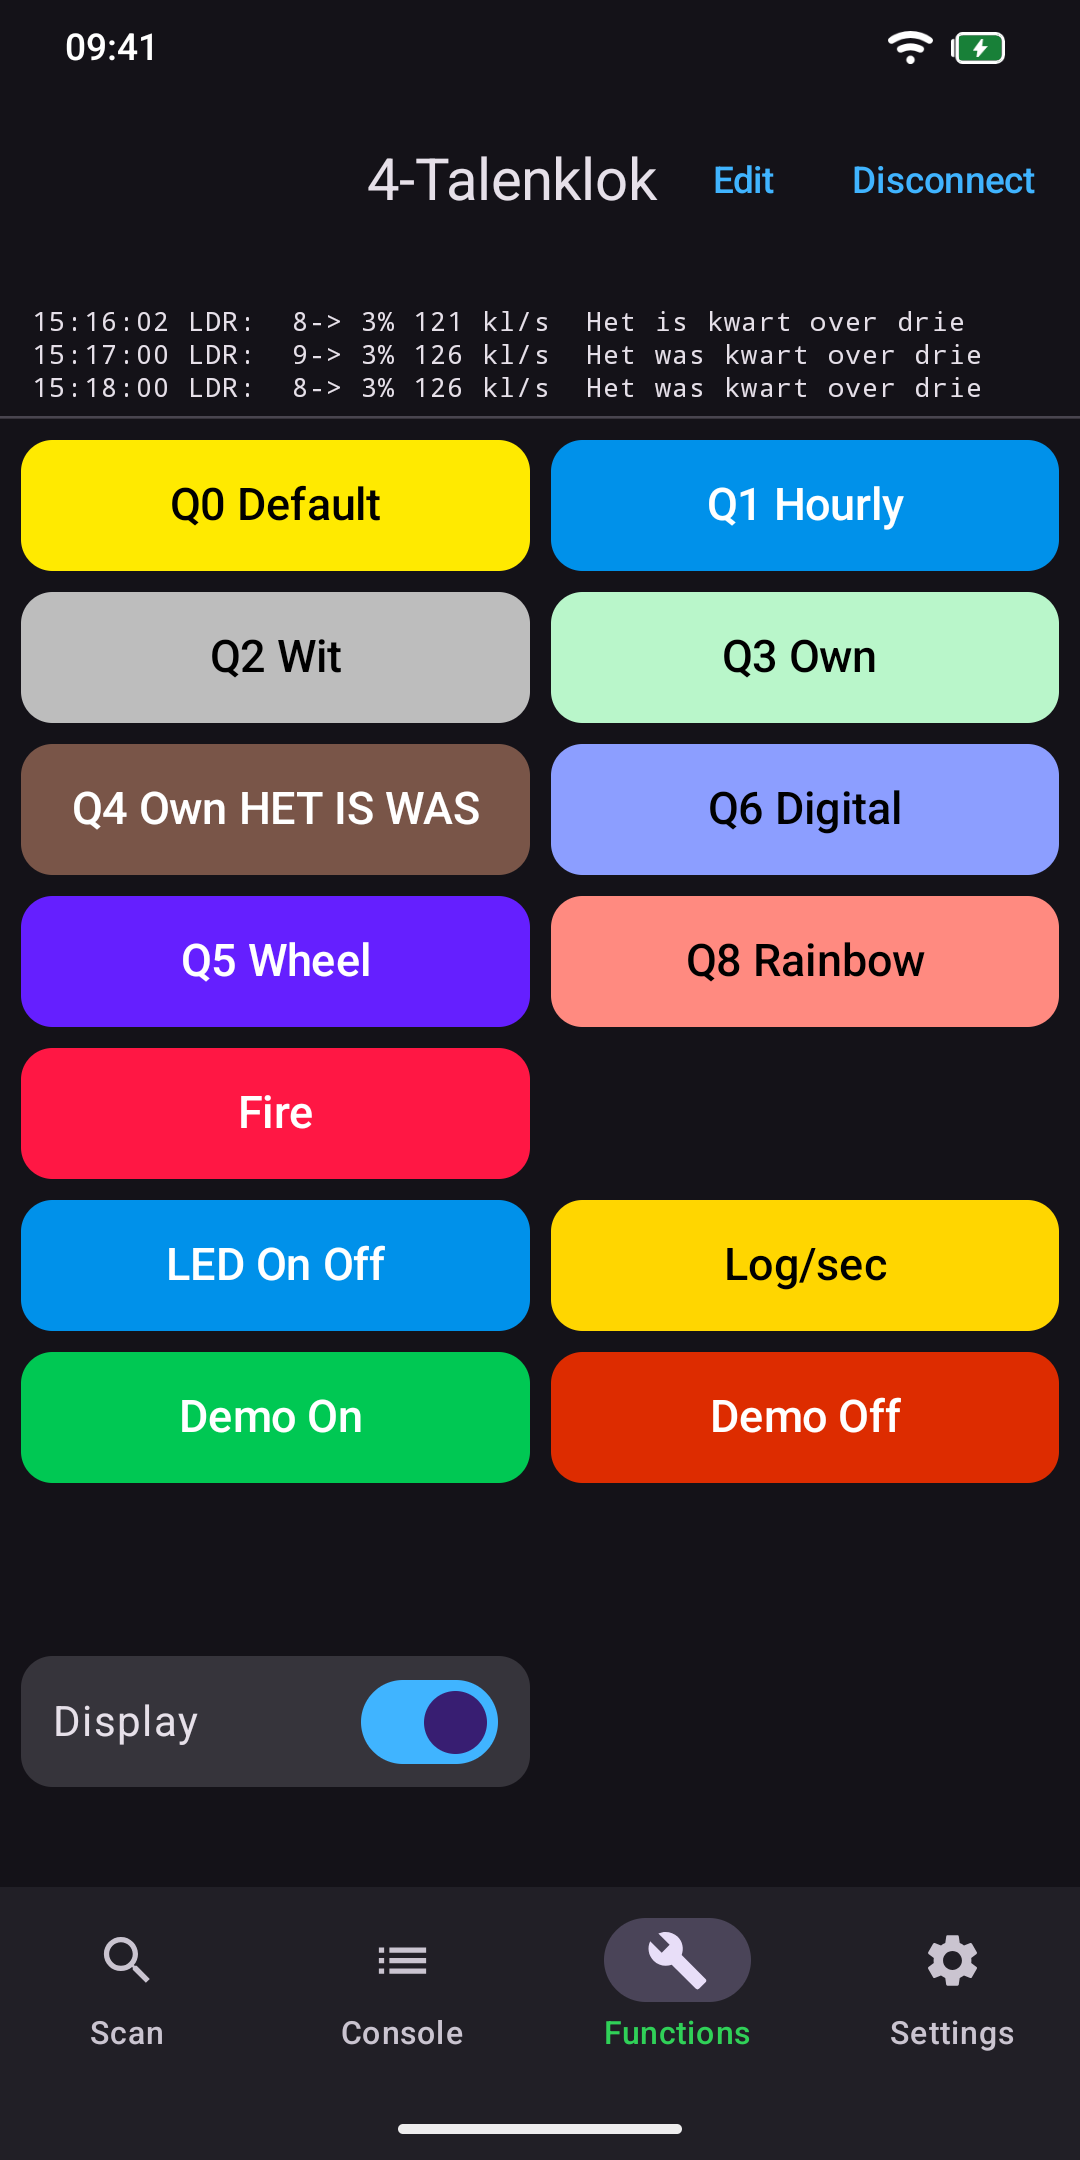
Above the grid is a live console strip showing the four most recent lines, in the same font and with the same options as the console, so you can watch a device respond without leaving the grid.
A plain button sends when you lift your finger. A button with Repeat set sends the moment you press it and keeps sending for as long as you hold it down.
The number of columns follows the Buttons per row setting. On Auto a phone shows one column upright and two on its side; a tablet two and three. Button size is Normal or Big.
Editing functions
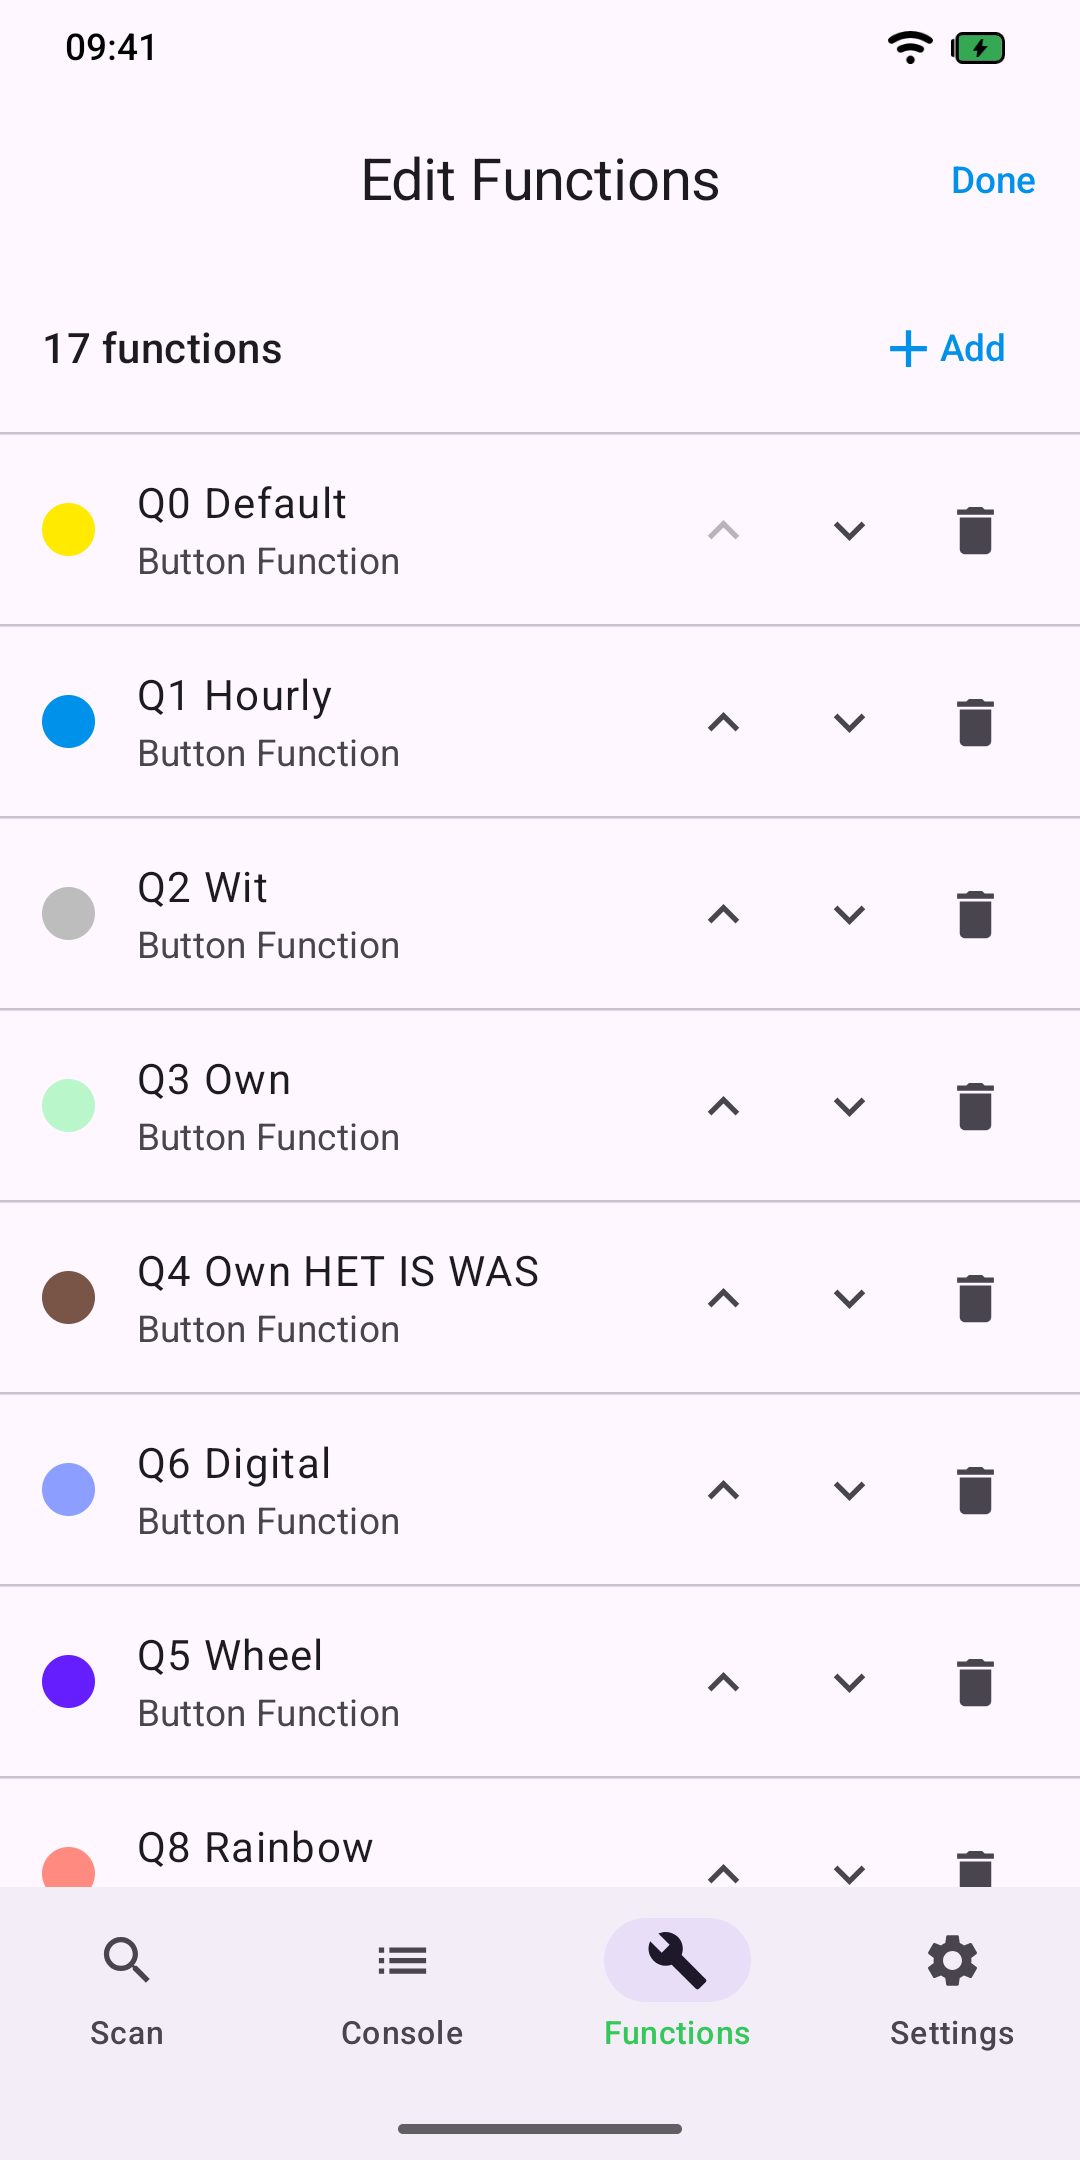
Tap Edit at the top right while the Functions tab is showing. The list shows every function. Use Add to create one at the end, the ↑ and ↓ arrows to move it, the bin to delete it (the app asks first), and tap a row to change it. Done returns to the grid. Changes are saved when you leave an editor.
There are three kinds of function.
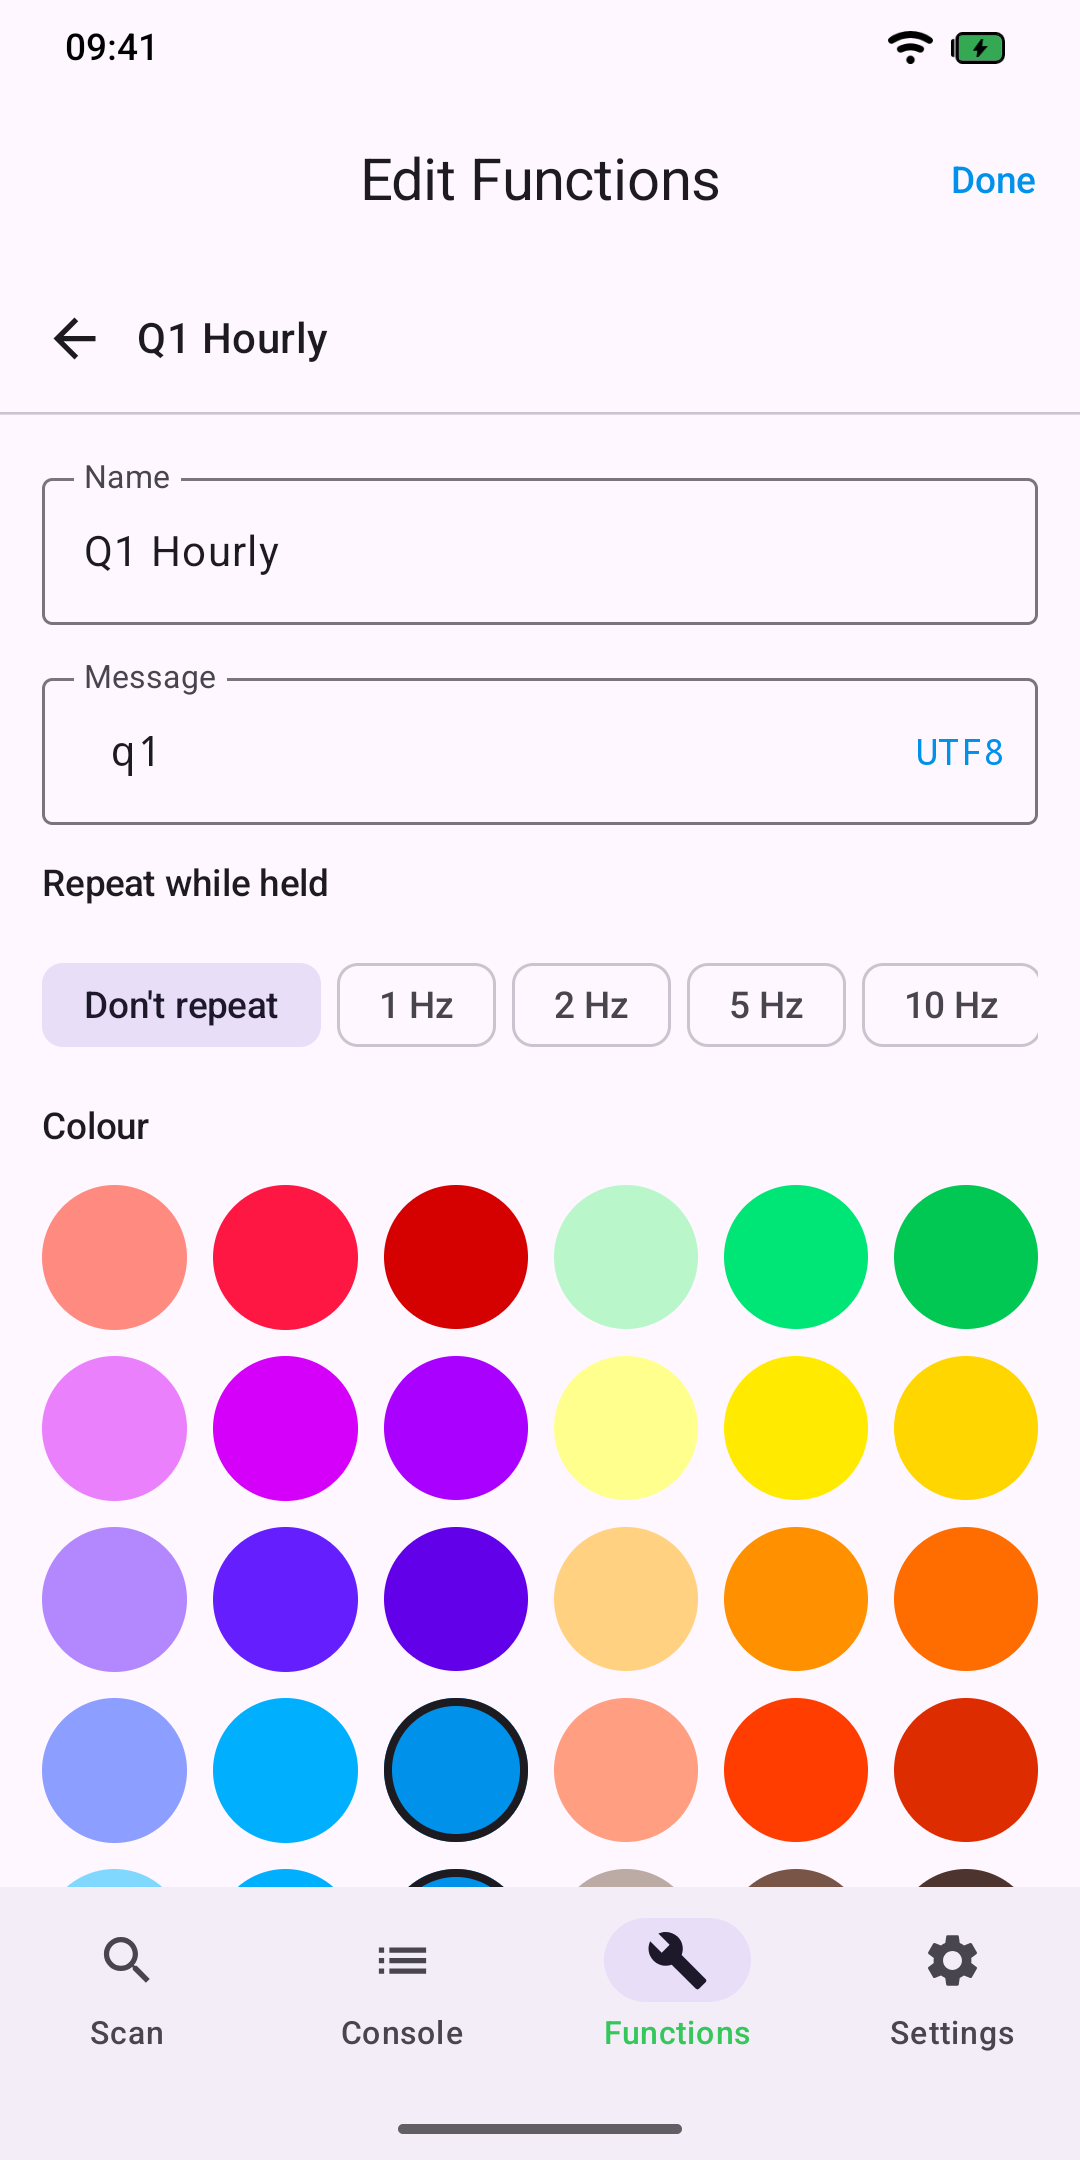
Button Function — sends one message when pressed. Give it a Name, a Message in whichever format you choose (the text is converted when you change format), a Repeat while held rate of 1, 2, 5 or 10 Hz — or Don’t repeat — and a Colour from the palette of 36. The label switches between black and white for contrast.
Toggle Switch Function — sends the On message when switched on and the Off message when switched off. Good for anything with two states, such as a light or a relay. Initial state is the position the switch shows when the app starts.
Clear Element — not a button at all, but an empty gap you can place in the grid to group related buttons together.
A new function starts empty, in UTF8. Append to function in Settings adds a line ending to every function message, in the same way Append to input does for what you type.
5Alerts
An alert watches the incoming data for a pattern you choose and reacts when it appears — useful for a device that only occasionally reports something you care about.
Open the list with the Alerts button at the top of the Console. Use Add for a new alert, tap one to edit it, and the bin to delete it (the app asks first). Each alert has:
- Active — switch an alert off without deleting it.
- Name — shown in the popup.
- Trigger — the bytes to look for, in any of the five formats.
- Sound — None, Up, Chime 1, Beep, New Message, Chime 2, Sonar, Keys, Ding, Level Up or Quindar. Picking one plays it.
- Show message — whether to show a popup when the trigger arrives.
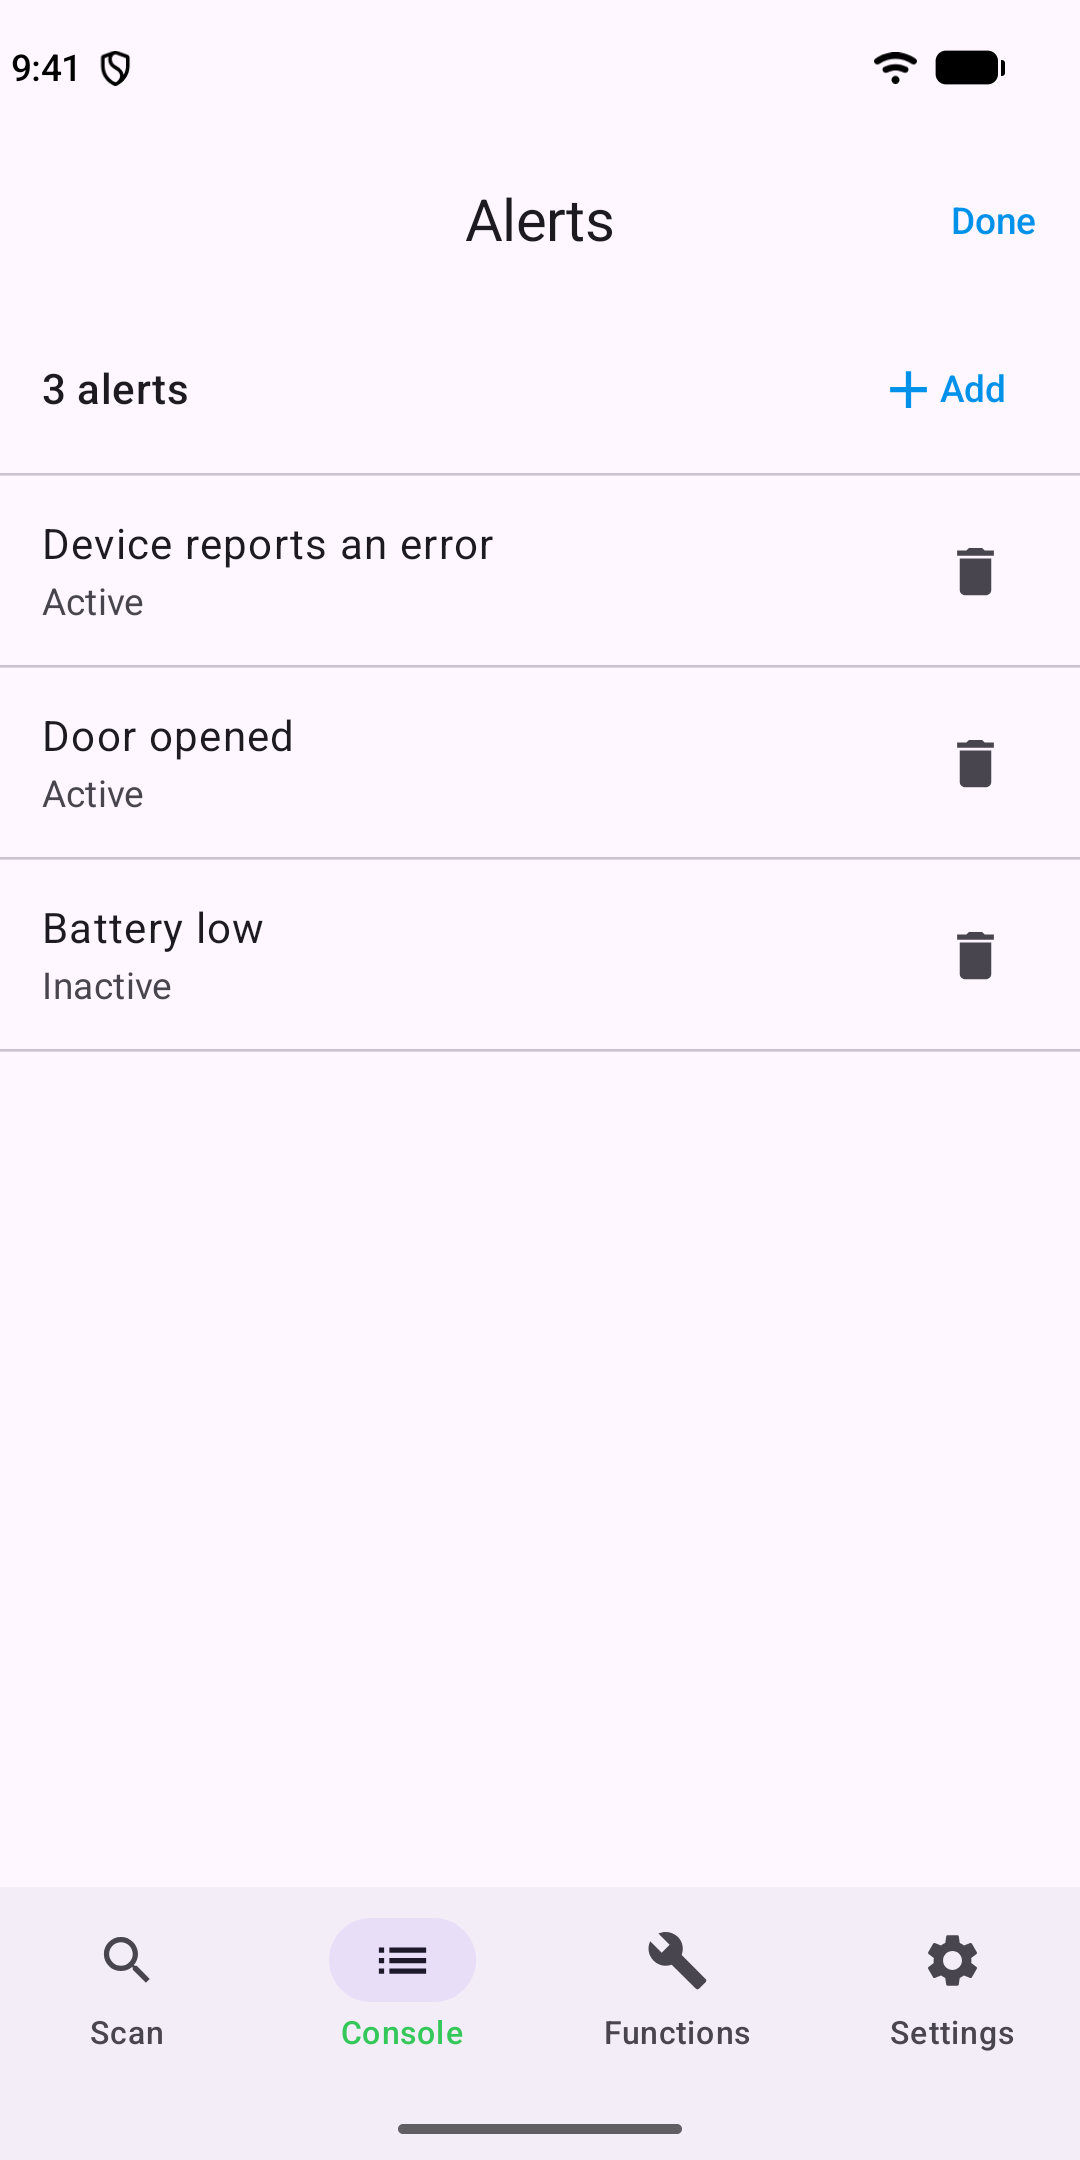
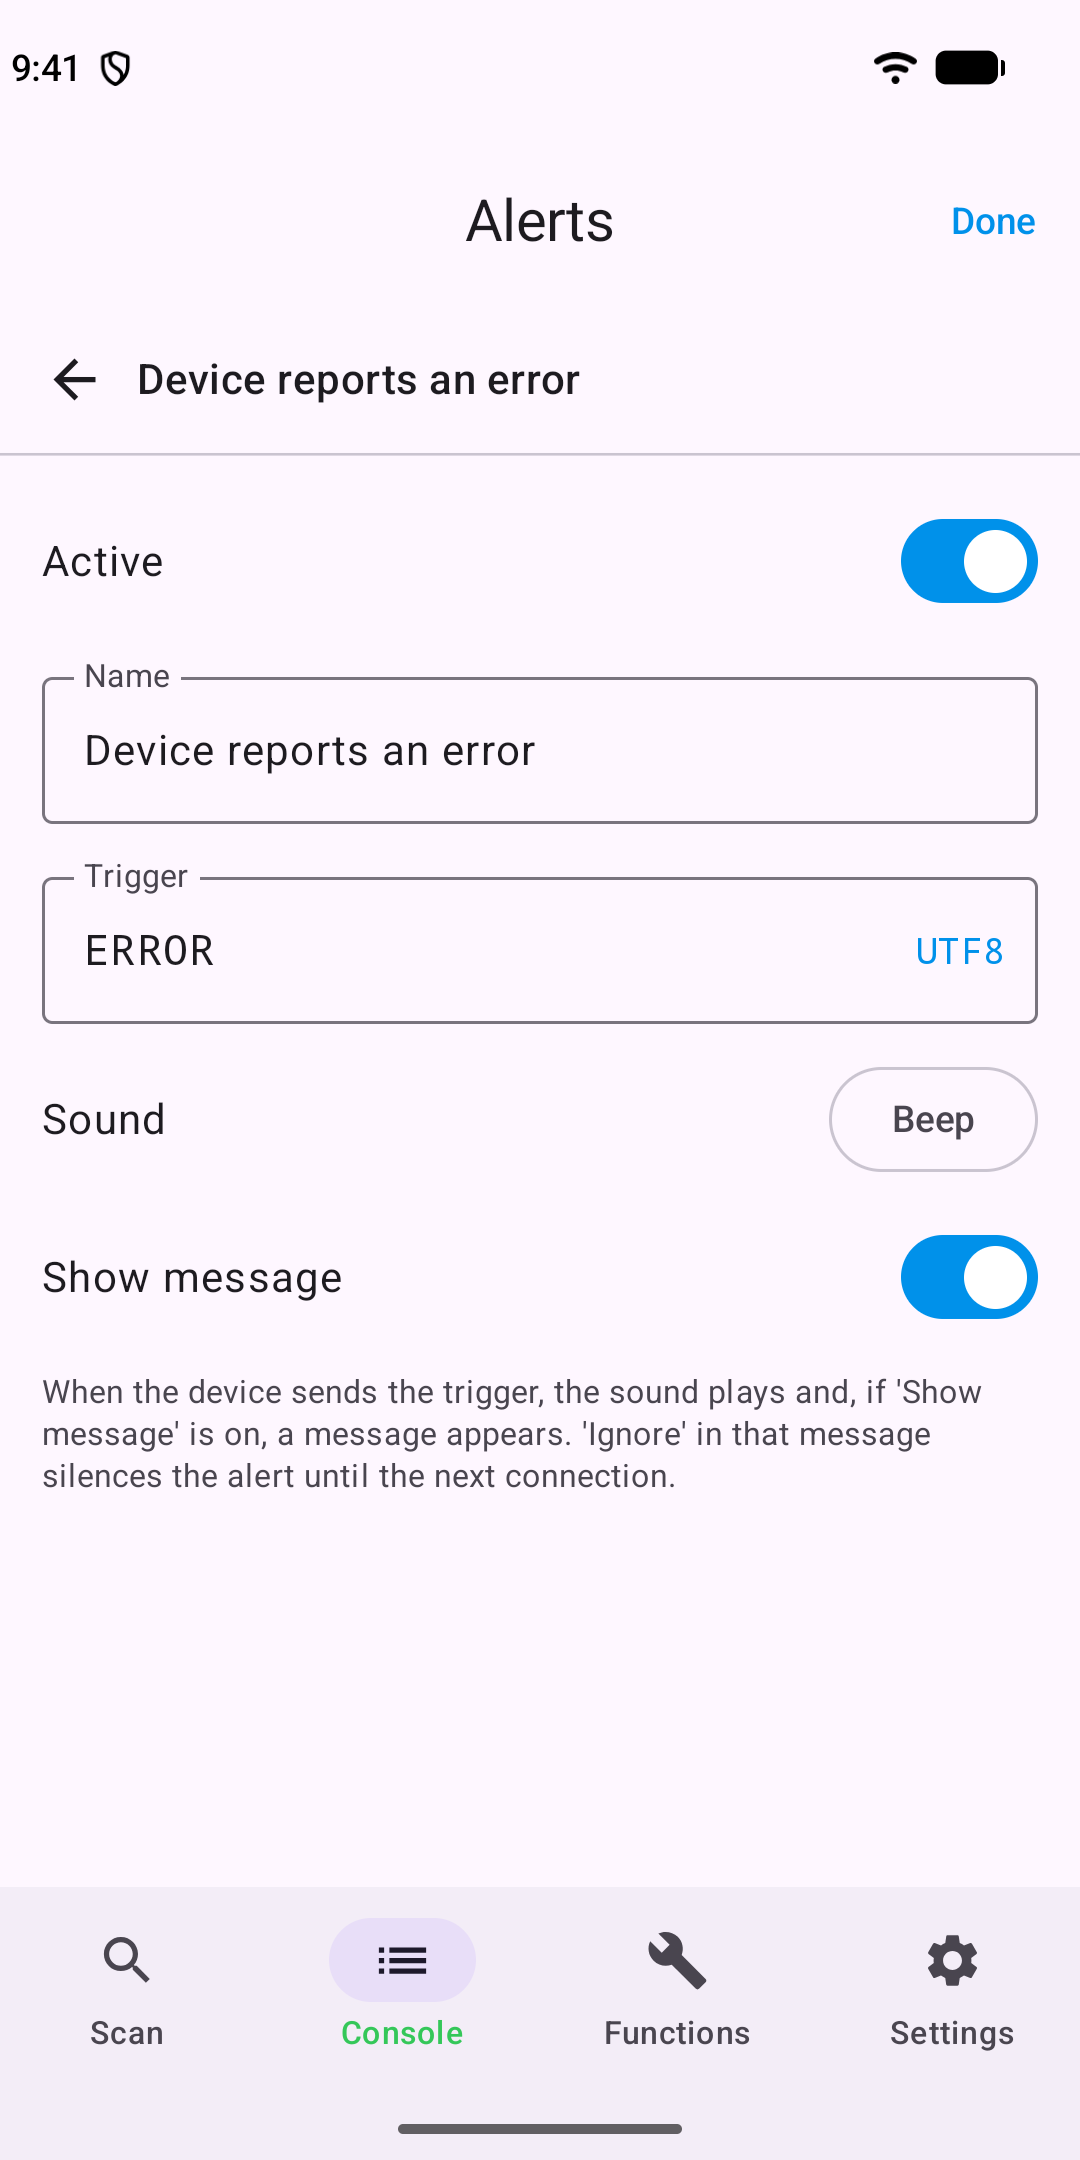
When an alert fires, the popup says Received with the trigger. OK closes it; Ignore closes it and silences that alert until the next connection.
The sound plays at the media volume, which you set with the volume buttons while the app is open. Unlike on the iPhone it does not follow a silent switch.
6Settings
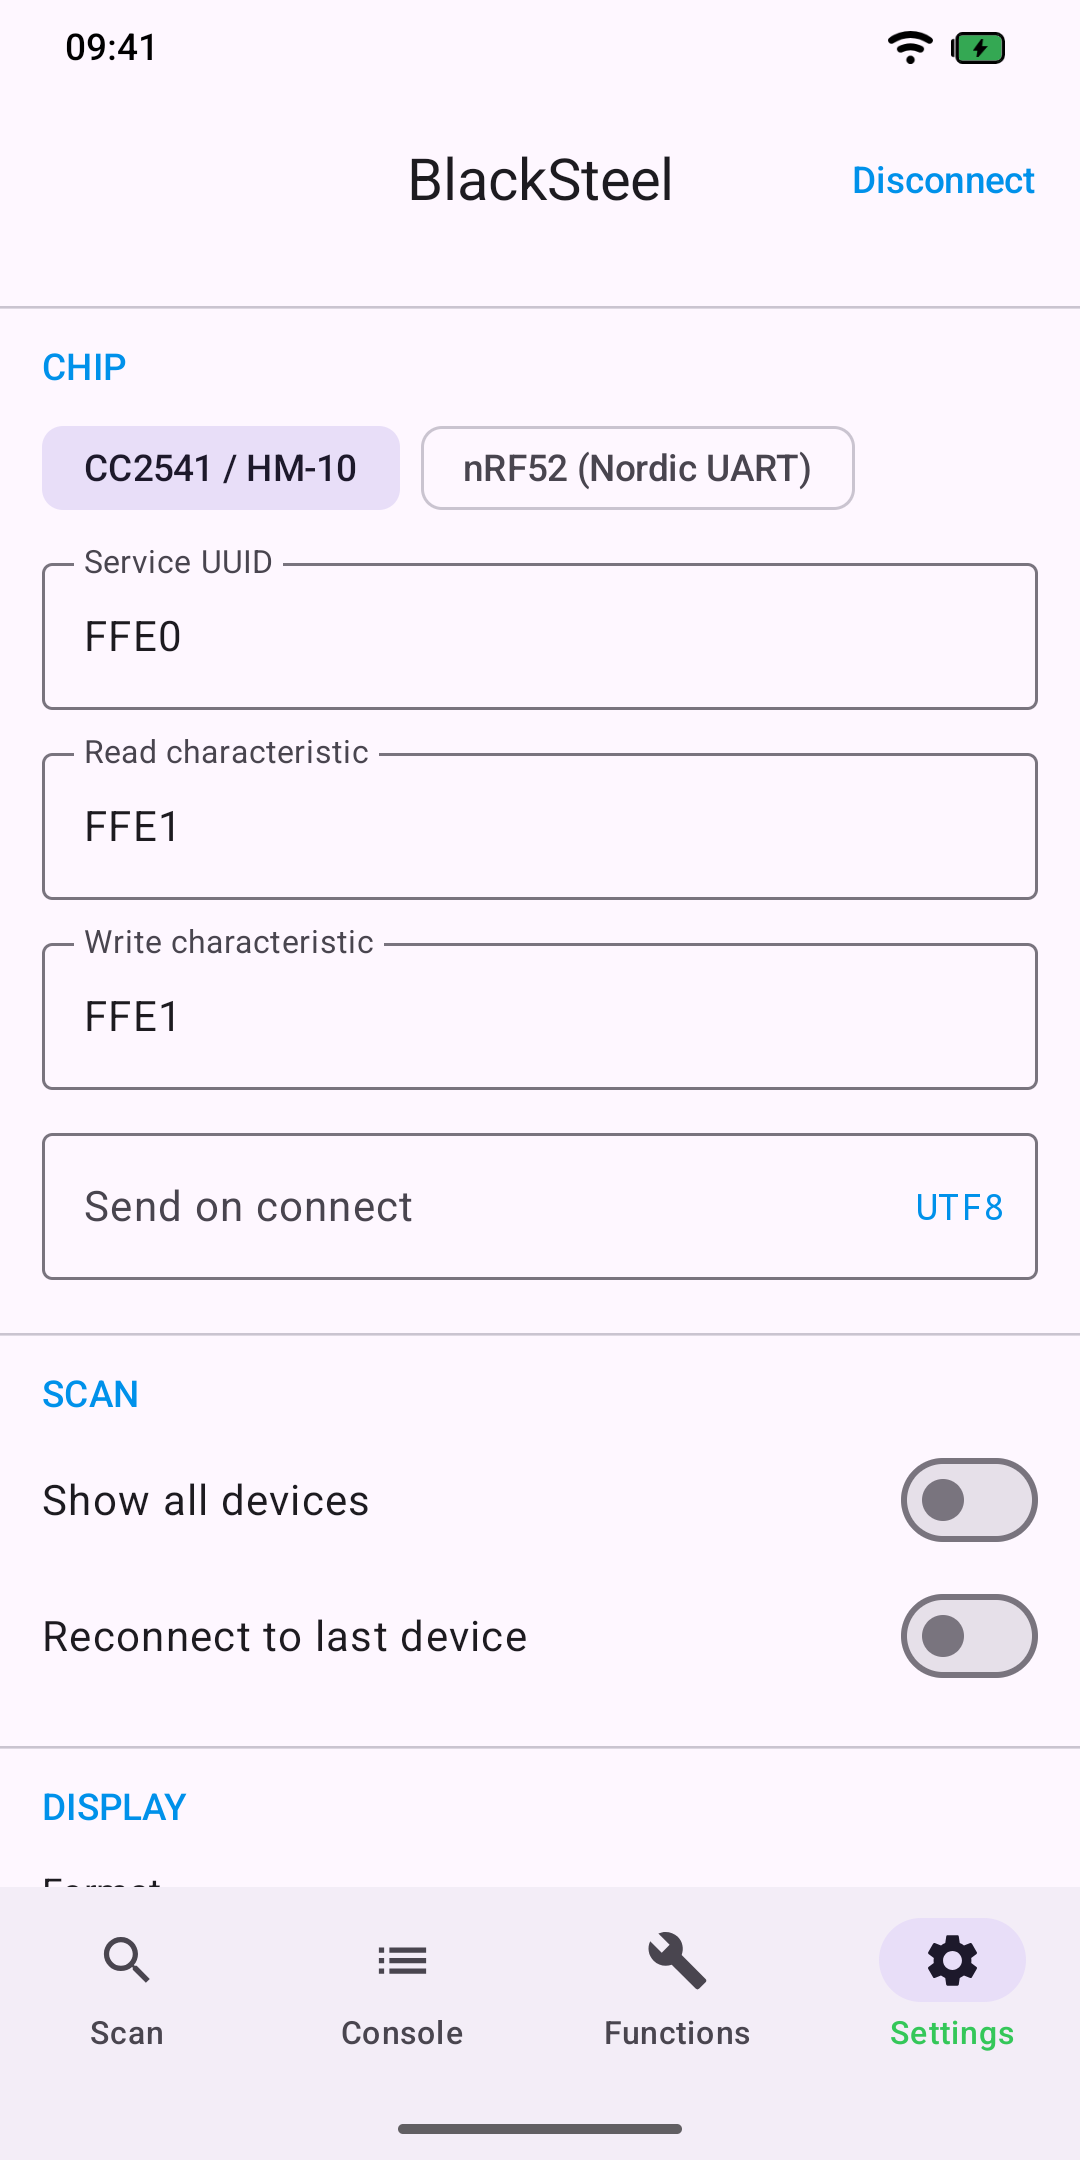
Chip
Choose CC2541 / HM-10 or nRF52 (Nordic UART); the three UUIDs below
are filled in for you (FFE0 / FFE1 / FFE1, or
the 6e400001 / 6e400003 / 6e400002 Nordic
UART UUIDs). Type your own UUIDs instead for a module using something non-standard;
the chip shows as custom. A 4- or 8-digit short form or a full 128-bit UUID is accepted;
anything else is shown in red and not saved.
This choice only matters for Show all devices and for devices that do not advertise a service the app recognises. A device that advertises FFE0 or the Nordic UART service is connected with the matching profile automatically.
Send on connect
A message sent automatically as soon as a connection is established, with a format menu. Leave it empty for none.
Scan
| Switch | Effect |
|---|---|
| Show all devices | Every BLE device in range, whatever it advertises |
| Reconnect to last device | See section 1 |
Display and Input
Described in section 3.
Functions
Buttons per row (Auto, 1 to 5), Button size (Normal or Big), Append to function, and Import… and Export (section 7).
App
Appearance — Automatic, Light or Dark. Automatic follows the system setting. Reset all settings puts every setting back to its default after asking; your functions, alerts and remembered device are kept.
The version number is at the very bottom of the page.
7Sharing your buttons
Export (Settings → Functions) writes all of your buttons to
exportedfunctions.json in the Downloads folder, replacing the previous
export, and then offers Share… so you can mail it or send it to another app.
On Android 8 and 9 the app asks where to save instead.
Import… reads a file back. If you choose Add the new functions go after
the ones you have; Replace swaps everything and cannot be undone. A
.json file you open from mail or the Files app with BLE Serial goes to the
same Import question.
The file is the same one the iPhone and iPad app (BLE Serial Pro) uses, so a set of buttons made on one can be imported on the other.
8Android and iPhone
The Android app follows the iPhone app feature for feature and carries the same version number. The differences are the ones the platform asks for:
- One app. The iPhone has three apps (HM-10, nRF52 and Pro); Android has this one, which handles both chip families and includes Functions.
- Moving a button is done with the ↑ and ↓ arrows in the Edit list; there is no drag-and-drop in the grid.
- Alert sounds follow the media volume, not a silent switch.
- Play sounds uses two short tones, since Android has no system sent and received sounds for apps.
- Permissions. Android asks for Nearby devices (Location on Android 8–11) before the first scan.
- Mac. There is no desktop version of the Android app.
9Video
A short video shows BLE Serial for Android in use with a real Bluetooth module: scanning, connecting, the console and the Functions buttons.
Watch the video (MP4, about 10 MB, 33 seconds)